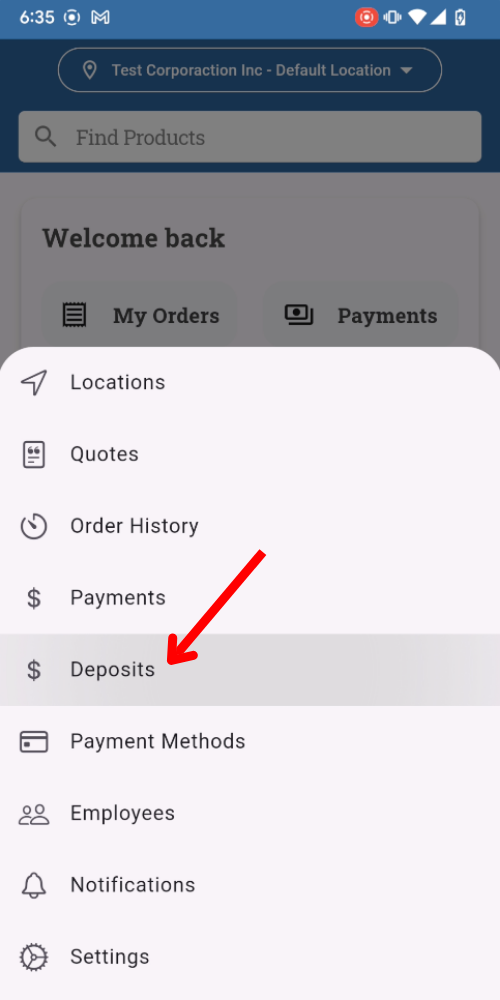
Deposit feature now available in the Customer Mobile App
With the proper permissions, your customers can now access and use the Deposit feature on the Mobile App. The mobile experience mirrors the desktop version where customers can enter a dollar amount, add a note, and choose a payment method.
Check it out in the images below!
Pricing now displayed next to shipping methods in the Customer Mobile App
Historically, once a shipping method was chosen in the Customer Mobile App, the price for that method was shown at checkout. While this is still the case, the price for each shipping method is now also displayed next to each shipping option prior to checkout. This mobile experience is now the same as the desktop version.
See the enhancements to the delivery method screen below:
Operations Portal
“Work Status” field added to the Tickets screen
A new field titled “Work Status” has been added to the Tickets screen in the Operations Portal. It can be viewed and edited via the Grid and Data tabs, as well as a ticket’s Details page. The “Work Status” field is viewable and can only be used by your internal teams while working on tickets, whereas the general “Status” field is visible to your customers if you are leveraging the customer ticketing system.
Watch the video below to see where you can access the new field on the Tickets screen:
https://youtu.be/PU298NRrgeM
New “Order Notes” screen added to the Operations Portal
A new screen titled “Order Notes” has been added to the Operations Portal where you can access all order notes synced from your ERP. A spreadsheet view is available so that you can easily search, create, edit, and delete order notes. The spreadsheet works the same as other spreadsheets throughout the Portal whereas you can customize the columns to your needs, save filter views, and more. Order notes can also be edited from a note’s Details page.
Watch this video for an overview of how to access and use the Order Notes screen:
https://youtu.be/1vNVlCBN_ms
Customer Portal
View and use unapplied cash records
Your customers can now view and use unapplied cash records when making payments. They can not only view the dollar amount of the unapplied cash record but also apply it toward invoice payments.
You can choose to show this information in both the Customer Portal and Operations Portal. To enable this feature for your customers, you will need to configure the settings in the Operations Portal. See how to do this in the video below:
https://youtu.be/iFddhtEMNoI
Tickets
KOD-13979: Create Mobile App Version for Customers Using Only Payments/Payment Portal
Regression Tests
Case 1
Test navigation menu in other default customer apps. They should not be changed from previous version of the app.
Case 2
Test global search in default customer app.
This should be displayed correctly and return results.
Tests
Case 1
Install the Payments-Only App.
Test the Home Screen of the Payments-Only App.
When you click on any displayed payment, the corresponding order should appear.
When You click view more under payments, payment screen should open.
When you click on an order, the specific order details should open.
When you click view more, order history screen should open.
Case 2
Test limited navigation menu to ensure that every tab is displayed and opens correctly.
Case 3
You should not be able to add products to the cart or perform any product manipulations as you would in the regular customer app. While you should be able to open a product within an order, the "Add to Cart" button should be disabled.
KOD-15852: Create Company API Tests
KOD-17917: Customer App - Payments Deposits
Tests
Case 1
Login to account, where deposits are enabled. Your customer should have isAccountPayable role.
Go to more → deposits.
Enter amount, note
Choose card or ACH.
Enter CVV for card.
Press Submit.
After loading, you should see success screen.
You should be able to navigate back to deposits or go to main screen.
You should see email within some time.
Case 2
Attempt to enter various characters in the "Amount" field that are neither numbers nor a period. These inputs should not be accepted.
Try submitting the form without filling in some of the required fields. You should receive an error message indicating that the submission is incorrect or incomplete.
Case 3
Go to deposits. Open available cards. Remember cards, that are shown.
Add a new card or delete existing one.
Go back to deposits.
Press refresh on the top.
Your card should be shown after refresh.
KOD-18191: Customer App iOS Issues
Regression Tests
Case 1
Log in to any app.
Navigate to "Payment Methods."
Choose either "My Account" or "Company Account."
Select the "Add Payment Method" option.
Confirm that you are adding a card.
Enter the card details.
Press Save.
You should be redirected back to the card selection screen, and the card should be successfully added.
Repeat the process for the company account. It's acceptable if the card is not added (as it is on the web). You should not encounter any errors after attempting to add the card.
Tests
Case 1
Login to the app, that supports quotes.
Go to more → quotes.
Press on filtering option.
Press on sorting by status.
Confirm that sorting by status works the same as it works on the web.
Case 2
Ensure your account has accountsPayable role.
Login to the app.
Open more menu.
Open payment methods.
You should not see “My Account” tab.
Case 3
Ensure your account doesn’t have accountsPayable role.
Login to the app.
Open more menu.
You should not see payment methods option.
Case 4
Use customer without agreedToACHTermsTimestamp under /operations/customers/{id}/custom-fields on operational portal.
Selected row should not exist or it’s value should be empty.
Confirm, that is possible to add test ACH account by yourself on the web.
Log in to an app that is not for this client.
Go to Payment Methods.
Change tab to Company Account.
Press “Add Payment Method” option.
Change payment method tab to ACH account.
You should see signature and “Agree to Terms” Switch.
Enter data for ACH account.
Press Save.
ACH account should be added.
Return to the form where you wrote data. You should not see “Agree to Terms” Switch.
Go to the operation portal on step 1 and confirm signature.
Case 5
Confirm, that is possible to update existing test ACH account by yourself on the web
Log in to an app that is not for this client.
Go to Payment Methods.
Change tab to Company Account.
Press “Add Payment Method” option.
Change payment method tab to ACH account.
You should not see signature and “Agree to Terms” Switch.
Press Save.
ACH account should be updated.
Case 6
Login to the app.
Go to payment Lists.
Add any list to the cart.
List should be added successfully.
You should be redirected to the cart and see products you’ve added.
Case 6
Biometric pop-up should not be shown for guests.
Case 7
App bars in category, locations (etc.) should be white for any app.
Case 8
Screen for more → Settings should be scrollable on small devices.
Case 9
If customerPaymentMethodsEnabled is = to 0 on the web settings, then on “payment methods”, company payment methods should be loaded correctly.
KOD-18971: Customer App - Extend filtering capabilities in non-product searches
Regression Tests
Case 1
Test faceting by selecting existing values in filters, where available (some filters may not include faceting, which is acceptable). Click on the filtering option located on the left side of the search bar, select the desired facets, and press 'Apply.' The search results should adjust according to the applied facets.
Case 2
Test creation of saved view.
Press filtering option on the left side of search bar.
Select facets or enter filters for results to be found (do not enter “completed” facet).
Press 3 dots on the top.
Press “Save view”.
Wait.
You should see massage on the bottom about saved filters.
Press 3 dots on the top.
Go to saved filters.
You should see your saved filter.
Case 3
Apply saved filtering.
Reset your filtering.
Go to saved filters.
Press on your saved filter.
Press Save.
Your filtering should apply.
Press apply.
Case 4
Deletion of filters.
Go to saved filters.
You should not be able to see tree dots of not your saved views.
Press on tree dots near your filter.
Press Remove.
Wait; your filter should be removed.
Case 5
Edit of saved filters.
Go to saved filters.
You should not be able to see tree dots of not your saved views.
Press on tree dots near your filter.
Press edit details.
Change name of filter.
Wait; your filter should be updated.
Tests
Case 1
Apply any filtering, so you only see 3-5 results with different value for testing.
Any filter should have options as Equals, Not equals, Empty, Not empty. Choose one of the filter, where your results have different values.
Test filters:
Equals – enter exact value of result. Only this value should be found.
Not equals – same as equals, but every other should be found, except entered one.
Empty / Not empty – when you choose this options you should not be able to change value or select date (for date filters). Text in the field with this filtering should be changed to EMPTY or NOT EMPTY. Found results should have empty or not empty value.
Case 2
Apply any filtering, so you only see 3-5 results with different value for testing.
String filters should have next options, in addition to common ones. You need to test them.
In – represent a list of values, separated by commas. Try to search for two different values in style: value 1, value 2, value 3. This is case sensitive.
Contains – your result must contain your substring. This is case sensitive.
Doesn’t contain - field in your result mustn’t contain your substring. This is case sensitive.
Starts with – your result must start with your substring.
Ends with – your result must end with your substring.
Case 3
Apply any filtering, so you only see 3-5 results with different value for testing.
Number filters should have next options, in addition to common ones. You need to test them.
Less then
Less then or equal
Greater then
Greater then or equal
For common numbers (for example Order number): you should see unformatted numbers on labels after the search
For currency (for example Total): you should see currency formatted string.
Case 4
Same filters as for numbers (look case 3, step 2).
When you press on date field you should see calendar button. When you press on this button, you should be able to choose date.
Test every filter (except between) with any chosen date from calendar button.
Try to modify date string, so it has incorrect format. You should not be able to apply filtering. You should not be able to save view.
Case 5
For both number and dates, between filtering should work in the next way:
When you press on between filtering, new input row should appear.
Second row should not have option to change filter type.
You should not be able to apply filtering or save view when one of the input field is empty (both should have values or both should be empty).
For dates filtering:
You should not be able to apply filtering or save view when either of two or both fields have incorrect format.
Case 6
Apply some filtering (any amount, different types).
Ensure that results are found correctly.
Save filters.
Your filters should be accessible from the web’s view.
Apply filters saved filters on the web. If some filters are not shown, they should be still applied. Go to Columns and select field, that was specified on the mobile, but not shown on the web.
Your filters should be successfully applied.
Same products should be found.
Case 7
Apply some filtering (fields, that filters are applied to, should be the same, as they are present on the mobile, otherwise it this saved view will be counted as unsupported and will not be shown on mobile.
Close and reopen app or add/remove filtering options for them to get updated.
If your view is supported then it should be present in the list. Select it
Press Save.
Your filters should be filled in correctly.
Press Apply.
Your results should be the same as on the web.
KOD-19720: Visual & Email Notification when Files are Attached to Kodaris/Customer Tickets
Regression Tests
Case 1
On Company entity: Add a comment, attach a customer file or an internal file. It should still working. Also, try to list and delete files from company. After doing any kind of the previous mentioned actions. Try to index the entity and check that it still working fine.
Case 2
On Ticket entity: Add a customer comment, internal comment, attach a customer file or an internal file. It should still working. Also, try to list and delete files from ticket. After doing any kind of the previous mentioned actions. Try to index the entity and check that it still working fine.
Case 3
On Order entity: Add a customer comment, internal comment, attach a customer file or an internal file. It should still working. Also, try to list and delete files from Order. After doing any kind of the previous mentioned actions. Try to index the entity and check that it still working fine.
Tests
New fields:
customerNoteCount
noteCount
customerFileCount
internalFileCount
Note: Company not have field customerNoteCount.
Case 1
You must to check if the Company has new fields populated with number of internal files, customer files and internal comments. Try to add/remove one of them and check that the number still being correct.
Also check that after re indexing, the new fields should contains the correct values.
Note: it could take a few seconds, so do not check immediately.
Case 2
You must to check if the Ticket has new fields populated with number of internal files, customer files and customer/internal comments. Try to add/remove one of them and check that the number still being correct.
Also check that after re indexing, the new fields should contains the correct values.
Note: it could take a few seconds, so do not check immediately.
Case 3
You must to check if the Order has new fields populated with number of internal files, customer files and customer/internal comments. Try to add/remove one of them and check that the number still being correct.
Also check that after re indexing, the new fields should contains the correct values.
Note: it could take a few seconds, so do not check immediately.
KOD-19933: MX Merchant Card Surcharge Service
Regression Tests
Those covers various payment flows - with payment provider surcharging and with platform logic convenience fee calculation.
Here we could test all the same test cases, but with no payment provider surcharging nor platform convenience fee calculation.
Configure a regular PriorityPayments merchant account with no MX Advantage (Surcharging) enabled.
Setting enableCreditCardFee should be off (i.e. nor platform logic for convenience fee calculation)
Case 1: Checkout (AuthOnly)
Set global setting (or your CompanySetting) checkoutPaymentAction-cardAccount = AUTHONLY
As logged in Customer that belongs to Company on your [Host].
Add items to cart, populate all needed info and checkout with stored CREDIT card.
No convenience fee should be applied.
Capturing auth payment.
After checkout - go to the operations portal and find your order.
On Payments tab click “Capture Authorization“ for auth only payment.
After auth captured - for payment with CREDIT card - there should just one main payment record, no additional Convenience Fee payment record.
Case 2: Checkout (Sale)
Set global setting (or your CompanySetting) checkoutPaymentAction-cardAccount = SALE (or if no global setting or company exists - this automatically default to SALE).
Repeat steps from Case 1.
For payment with CREDIT card - there should just one main payment record, no additional Convenience Fee payment record.
Case 3: Checkout (StoreToken)
Set global setting (or your CompanySetting) checkoutPaymentAction-cardAccount = STORE_TOKEN.
As logged in Customer that belongs to Company on your [Host].
Add items to cart, populate all needed info and checkout with stored CREDIT card.
Go and find this order in employee portal. Click pay order and chose “Credit card entered during checkout“.
Check Payments tab for this order (also can check Accounts receivable records) to see what surcharge amount was applied for the payment.
For payment with CREDIT card - there should just one main payment record, no additional Convenience Fee payment record.
Case 4: Pay open invoices in Customer Portal
Pay open invoices with CREDIT card.
For payment with CREDIT card - there should just one main payment record, no additional Convenience Fee payment record
Case 5: Deposit payment in Customer Portal
Make a Deposit Payment with CREDIT card.
For payment with CREDIT card - there should just one main payment record, no additional Convenience Fee payment record.
Case 6: Order payment as Employee (Sale)
As logged in Employee:
Start Order on a Company.
Add items, populate info, calculate totals.
Pay Order: Make a SALE payment with CREDIT card - leave payment amount blank - i.e. pay order total.
For payment with CREDIT card - there should be just one main payment record, no additional Convenience Fee payment record.
Case 7: Order payment as Employee (AuthOnly)
As logged in Employee:
Start Order on a Company.
Add items, populate info, calculate totals.
Pay Order: Make an AUTHONLY payment with CREDIT card - fill payment amount, e.g. some value that is about an order total.
Check Accounts Receivable records to see if payment record created.
Capturing auth payment:
After making auth only transaction - go to Payments tab and click “Capture Authorization“ for auth only payment.
After auth captured - for payment with CREDIT card - there should be just one new payment record created (captured auth), no additional Convenience Fee payment record.
Note: when capturing auth - it will use order.total for this transaction, as order could have changed since auth transaction was captured (e.g. items added or quantity changed).
Case 8: Deposit payment in Employee Portal
As logged in Employee:
For you test Company that is tagged to your [Host].
Make a Deposit Payment with CREDIT card.
For payment with CREDIT card - there should be just one main payment record, no additional Convenience Fee payment record.
Case 9: COD Payment (Sale)
As logged in Employee:
For you test Company that is tagged to your [Host].
Create Order and request COD payment.
Set global setting codPaymentAction-cardAccount = SALE (or if no setting or it is empty - this automatically default to SALE).
Open COD payment form, fill data and make a payment with CREDIT card.
For payment with CREDIT card - there should be just one main payment record, no additional Convenience Fee payment record.
Case 10: COD Payment (AuthOnly)
As logged in Employee:
For you test Company that is tagged to your [Host].
Create Order and request COD payment.
Set global setting codPaymentAction-cardAccount = AUTHONLY.
Open COD payment form, fill data and make a payment with CREDIT card.
Check Accounts Receivable records.
No Convenience Fee record should be created.
Capturing auth payment:
After making payment - go to Order Payments tab and click “Capture Authorization“ for the auth only payment.
For payment with CREDIT card - there should be just one main payment record, no additional Convenience Fee payment record.
Tests
Setup:
Configure PriorityPayments on a [Host] (or globally) - use merchant account with MX Advantage enabled (see credentials added by Jack in comments below).
Turn on the new setting: priorityPaymentsMxAdvantageEnabled = 1 (if configuring on a host - add this setting manually).
After adding cards - open details (“Edit“) and check card type there (Credit or Debit) to make sure those are correct: as we do automatic check when adding card - and if successfully retrieved this info from payment provider - it will be used (no matter what was manually selected in the dropdown).
MX Advantage (Surcharging) Test Cases
PriorityPayments merchant account with MX Advantage enabled.
Setting enableCreditCardFee should be off.
Case 1: Checkout (AuthOnly)
Set global setting (or your CompanySetting) checkoutPaymentAction-cardAccount = AUTHONLY.
As logged in Customer that belongs to Company on your [Host].
Add items to cart, populate all needed info and checkout with stored card.
while checking out - check in the operations portal logs to see what fee amount / surcharge amount was calculated by provider.
Check Accounts receivable records to see what surcharge amount was applied for the payment.
Note: value2 for these payments will be Authorization.
Appendix: Capturing auth payment.
After checkout - go to the operations portal and find your order.
On Payments tab click “Capture Authorization“ for auth only payment.
After auth captured - for payment with CREDIT card - there should be an additional Convenience Fee payment record saved (txn type = 94), for payment with DEBIT card - there will be no fee payment record.
Case 2: Checkout (Sale)
Set global setting (or your CompanySetting) checkoutPaymentAction-cardAccount = SALE (or if no global setting or company exists - this automatically default to SALE).
Repeat steps from Case 1.
For payment with CREDIT card - there should be an additional Convenience Fee payment record saved (txn type = 94), for payment with DEBIT card - there will be no fee payment record.
Case 3: Checkout (StoreToken)
Set global setting (or your CompanySetting) checkoutPaymentAction-cardAccount = STORE_TOKEN
As logged in Customer that belongs to Company on your [Host].
Add items to cart, populate all needed info and checkout with stored card.
Go and find this order in employee portal. Click pay order and chose “Credit card entered during checkout“.
While making this payment - check in the operations portal logs to see what fee amount / surcharge amount was calculated by provider.
Check Payments tab for this order (also can check Accounts receivable records) to see what surcharge amount was applied for the payment.
For payment with CREDIT - there should be an additional Convenience Fee payment record saved (txn type = 94), for payment with DEBIT card - there will be no fee payment record.
Case 4: Pay open invoices in Customer Portal
With CREDIT card (fee amount should be calculated by payment provider and included in total of card transaction, 2 records should be created - one for main amount and one for convenience fee).
With DEBIT card (fee amount should be 0, one record should be created for main amount, no convenience fee record).
Check in the operations portal logs that configured merchantId was used for this transaction.
For payment with CREDIT card - there should be an additional Convenience Fee payment record saved (txn type = 94), check employee portal Accounts Receivable screen.
Case 5: Deposit payment in Customer Portal
Make a Deposit Payment.
With CREDIT card (fee amount should be calculated by payment provider and included in total of card transaction).
With DEBIT card - (fee amount should be 0).
Note: for some reason PriorityPayments started return non-zero surcharge for debit card. We don’t control it and apply surcharge amount returned by provider.
Check in the operations portal logs that configured merchantId was used for this transaction.
Check Accounts receivable records in the operations portal to see what surcharge amount was applied for the payment.
Check if Convenience Fee payment record created along with the main payment record for CREDIT card payment (and no additional Convenience Fee payment record for DEBIT card payment)
Case 6: Order payment as Employee (Sale)
As logged in Employee.
Start Order on a Company.
Add items, populate info, calculate totals.
Pay Order: Make a SALE payment.
With CREDIT card - leave payment amount blank - i.e. pay order total (fee amount should be calculated by payment provider and included in total of card transaction).
Wwith DEBIT card - fill payment amount, e.g. some value that is less than order total (fee amount should be 0).
Check in the operations portal logs that configured merchantId was used for this transaction.
For payment with CREDIT card - there should be an additional Convenience Fee payment record saved (txn type = 94), check Payments tab of the order and/or Accounts Receivable screen.
Case 7: Order payment as Employee (AuthOnly)
As logged in Employee.
Start Order on a Company.
Add items, populate info, calculate totals.
Pay Order: Make an AUTHONLY payment.
With CREDIT card - fill payment amount, e.g. some value that is less than order total (fee amount should be calculated by payment provider and included in total of card transaction)
With DEBIT card - leave payment amount blank - i.e. pay order total (fee amount should be 0).
Check in the operations portal logs that configured merchantId was used for this transaction.
Check Accounts receivable records to see what surcharge amount was applied for the payment.
Appendix: Capturing auth payment.
After making auth only transaction - go to Payments tab and click “Capture Authorization“ for auth only payment.
After auth captured - for payment with CREDIT card - there should be an additional Convenience Fee payment record saved (txn type = 94), for payment with DEBIT card - there will be no fee payment record
Note_: when capturing auth - it will use order.total for this transaction, as order could have changed since auth transaction was captured (e.g. items added or quantity changed).
Case 8: Deposit payment in Employee Portal
As logged in Employee.
For you test Company that is tagged to your [Host].
Make a Deposit Payment.
With CREDIT card (fee amount should be calculated by payment provider and included in total of card transaction).
With DEBIT card - (fee amount should be 0).
Check in the operations portal logs that configured merchantId was used for this transaction.
Check Accounts receivable records to see what surcharge amount was applied for the payment.
Check if Convenience Fee payment record created along with the main payment record for CREDIT card payment (and no additional Convenience Fee payment record for DEBIT card payment).
Case 9: COD Payment (Sale)
As logged in Employee.
For you test Company that is tagged to your [Host].
Create Order and request COD payment.
Set global setting codPaymentAction-cardAccount = SALE (or if no setting or it is empty - this automatically default to SALE).
Open COD payment form, fill data and make a payment:
With CREDIT card (fee amount should be calculated by payment provider and included in total of card transaction).
With DEBIT card - (fee amount should be 0).
Run the same test as for credit card, just use a debit card.
Check Accounts receivable records to see what surcharge amount was applied for the payment.
Check if Convenience Fee payment record created along with the main payment record for CREDIT card payment (and no additional Convenience Fee payment record for DEBIT card payment).
Case 10: COD Payment (AuthOnly)
As logged in Employee.
For you test Company that is tagged to your [Host].
Create Order and request COD payment.
Set global setting codPaymentAction-cardAccount = AUTHONLY.
Open COD payment form, fill data and make a payment.
With CREDIT card (fee amount should be calculated by payment provider and included in total of card transaction).
With DEBIT card - (fee amount should be 0).
Run the same test as for credit card, just use a debit card.
Check Accounts receivable records to see what surcharge amount was applied for the payment.
No Convenience Fee record should be created right after.
Capturing auth payment:
After making payment - go to Order Payments tab and click “Capture Authorization“ for the auth only payment.
Check if Convenience Fee payment record created along with the main payment record for CREDIT card payment (and no additional Convenience Fee payment record for DEBIT card payment).
KOD-20128: Remove Cono Records
KOD-20441: Load Subscription Data
KOD-20488: Implementation - ERP configuration
KOD-20495: Incorrect Non Tax Reason for items which are Non-Taxable
KOD-20557: Create a video for URL Rewrites
KOD-20605: Add invoiceDelivery and statementDelivery fields in the Employee Portal - UX
KOD-20628: Add order export to JS
Tests
Case 1
On swager , go to order API and run the next endpoint:
/api/system/order/exportAsNdjson
Case 2
Go to user script and try the new server side export:
KOD-20696: Implementation - Brand Customer Mobile App
KOD-20719: Implementation - shipping methods
Regression Tests
Case 1
Please test that we can see shipping methods and delivery&payments page as usual.
KOD-20824: Implementation - Test sending notifications
KOD-20826: Scope where to Tag Type on Orders for Industry Type
Regression Tests
Case 1
Make sure jobTypes setting value is empty.
Open Order Details.
Make sure there is no Industry Type field on the Order Details.
Case 2
With the empty jobTypes setting check Order Details Tab of the Order which can be released to ERP.
Add a new shipto and click release to ERP.
No errors linked to the feature changes should arise.
Case 3
Perform all the steps from above for another order but don’t select “Add new shipto”.
No errors linked to the feature changes should arise.
Tests
Case 1
Make sure there are values within jobTypes setting.
On the Order Details make sure new Industry Type field with dropdown was added to the detail page.
Dropdown values should be taken from the setting.
Case 2
On the Order Detail page leave Industry Type field empty.
Select “Add a new shipto for this order”.
Click “Release to ERP” button.
Make sure following message appears on the screen:
Please select Industry Type for order with new shipto before releasing to ERP
Case 3
On the Order Detail page select value within Industry Type dropdown.
Select “Add a new shipto for this order”.
Click “Release to ERP” button.
Make sure message message from Case 2 doesn’t appear on the screen.
For the production environment you should be able to release your order to ERP.
Case 4
Make sure there are values within jobTypes setting.
On the Order Detail tab.
Select/don’t select values from the Industry Type dropdown.
Don’t select “Add new shipto…”.
Try releasing order to ERP.
Message from case 2 shouldn’t appear on the screen.
KOD-20868: Update Data in Purchase Order # Field that's Autofilled on Direct Ship Orders
KOD-20874: Implementation - invoice and statements
KOD-20877: Implementation
KOD-20878: Implementation
KOD-20889: Accessibility Widget Fixes
KOD-20895: Implementation - Datamatx set up
KOD-20903: Search string broken with search and facet selection
Regression Tests
Case 1
Make sure search is still working on catalogs:
Company catalog
Company group catalog
Customer catalog
Case 2
Go to a category page and add in any filter → make sure it is working the same as before.
Case 3
Search for any product → make sure that search is working the same as before.
Tests
Case 1
For both logged in and logged out users, search for some products → click one of the facets → notice the search is working correctly and you will only see searchString once in the URL and products should be showing accordingly.
KOD-20923: Home Page Tweaks
Tests
Case 1
You need to enter edit page mode.
Add sectionx.
Change the Display field to Yes in several slides in the section.
Click the Save button.
Go to preview and confirm that it works as expected.
Pagination (you can switch between slides in the section).
Autoplay (slides should automatically scroll every three seconds).
Case 2
You need to enter edit page mode.
Add sectionx.
Click the Save button.
Go to preview.
Confirm that this section occupies the entire available height of the screen, with a bit of the next section visible at the bottom.
If the screen height is reduced, the section size should decrease proportionally.
Also, confirm that if the screen height is very small, there will be no overlaps.
Case 3
You need to enter edit page mode.
Add sections.
Enter a parentCategoryCode into the section input.
Click the Save button.
Confirm that the preview of the section on the edit page is displayed correctly and that there is text under the Title saying this is just a preview.
Go to the real page.
Confirm that the section is displayed without any errors, the products are visible, and the section automatically adjusts to screen sizes.
KOD-20932: Remove labor lines on all docs
Regression Tests
Case 1
On a Cash Quote Generate Internal PDF. As a template use TEST-workOrder template.
Make sure generated PDF is loaded with no issues.
Case 2
On a Cash Quote Generate Internal PDF. As a template use TEST-loadingList template.
Make sure generated PDF is loaded with no issues.
Case 3
On a Cash Quote Generate Internal PDF. As a template use TEST-cashQuoteEstimate template.
Make sure generated PDF is loaded with no issues.
Tests
Case 1
On a Cash Quote Generate Internal PDF. As a template use TEST-workOrder template.
Make sure all labor items are excluded from the items table.
Case 2
On a Cash Quote Generate Internal PDF. As a template use TEST-loadingList template.
Make sure all labor items are excluded from the items table.
Case 3
On a Cash Quote Generate Internal PDF. As a template use TEST-cashQuoteEstimate template.
Make sure all labor items are excluded from the items table.
KOD-20956: Update Interceptor to make shipping methods host compatible
KOD-20967: Mobile App - support shipping rates
Regression Tests
Case 1
If web has no prices near delivery methods, then you should not see any changes:
Tests
Case 1
Your delivery methods should be sorted like on the web.
Case 2
You should see prices for delivery methods like on the web.
KOD-20969: Change how inventory is pulled
Regression Tests
Case 1
We want to make sure that SKU’s with the default filters are still retrieved.
Use /api/account/product/directOrderList and verify that if you don’t send a inventoryLastModified then you will get the SKU’s where:
trackInventory is TRUE
warehouse is ACTIVE
sku is ACTIVE
Case 2
We have introduced new fields, ‘created’ and 'lastModified,' which are populated each time a product is added to a catalog. Please verify that products can still be added to a catalog, whether by customers or employees.
Tests
Case 1
Add products with corresponding SKUs that have inventoryLevelModified values to the Direct Order catalog. Verify that the new created field is properly added to the product entity. You can confirm this by checking the network tab and ensuring that the created field displays the current date.
Use the /api/account/product/directOrderList endpoint to run tests. Send a request with an inventoryLastModifiedSince value greater than the sku.inventoryLastModified and less than the companyProductCategoryProduct.created value.
KOD-20982: Record requests and responses to system events
KOD-21094: For Unilog and Opticat, add the incoming payloads to document db
Regression Tests
Case 1
For opticat, syncing product should still working as it was before.
Case 2
For unilog, syncing product should still working as it was before.
Tests
Case 1
When we sync a product from opticat, should be a custom record in the synced product with the id = productID__opticat.
Case 2
When we sync a product from unilog, should be a custom record in the synced product with the id = productID__unilog.
KOD-21103: Update Register Endpoint to Enable Card Payment System
Tests
Case 1
Test that a newly registered customer can still process credit card payments even when global card settings are disabled (enableGlobalSettingsForPaymentProcessingcardAccount is OFF).
KOD-21104: [UX] - Add new field named workStatus to tickets - Account Ticket Emails
Regression Tests
Case 1
Locate the "Ticket" screen.
Select any ticket and open its detailed view.
Test the "Detail" tab.
Ensure that all fields in the "General Info" section can be modified.
Change each field.
Return to the main ticket page and verify that the changes are reflected in the edited ticket.
Verify that all tabs in the Ticket screen function correctly.
Ensure there are no errors in the console.
Tests
Case 1
Locate the Ticket screen.
Go to the Search tab.
Check that the Work Status field is present.
Click on the Work Status field and select a filter.
Verify that the tickets displayed are filtered according to the selected Work Status.
Navigate to the Data tab.
Attempt to create a new ticket by entering the ticket details and pressing Enter.
Verify the filter functionality by using the Work Status field.
Ensure that only the relevant tickets are displayed according to the selected Work Status filter.
Select the newly created ticket and open the detailed view.
Test the Detail tab.
Attempt to change the Work Status field.
Return to the main ticket screen and locate the recently edited ticket.
Confirm that the workStatus has been updated.
Open the detailed view of the created ticket.
Go to the "Linked Ticket" tab.
Check that the workStatus field has been added.
Navigate to the Development" tab.
Ensure that the workStatus field is present.
Attempt to change the workStatus field.
Return to the main ticket screen and verify that the workStatus has been updated.
Expected Results: The workStatus field should be added to each Ticket screen if allowed by the API.
On the product for which interval, minimum and maximum order quantities weren’t configured. Check this product on following pages:
Product page
Category grid/list/catalog view
Shopping cart
That quantity is increased/decreased by 1 and you can add this product to a cart with no issues.
Tests
Case 1
Configure only Interval Order Quantity on the product.
Check this product on following pages:
Product page
Category grid/list/catalog view
Shopping cart
Make sure by default minimum quantity shown is interval order quantity (since you haven’t configured minimum order quantity initially).
Make sure that quantity can be updated only by the configured interval on those pages.
Case 2
Configure Interval Order Quantity, Maximum Order Quantity and Minimum Order Quantity on the product.
Check this product on following pages:
Product page
Category grid/list/catalog view
Shopping cart
Make sure that by default on a product quantity is shown minimum order quantity. Quantity could be updated only by your configured interval and should not be more that your configured maximum order quantity.
Case 3
Configure Maximum Order Quantity and Minimum Order Quantity on the product.
Check this product on following pages:
Product page
Category grid/list/catalog view
Shopping cart
Make sure that by default on a product quantity is shown minimum order quantity.
Quantity could be updated only by interval of 1 and should not be more that your configured maximum order quantity.
Case 4
Configure Interval Order Quantity, Maximum Order Quantity on the product.
Check this product on following pages:
Product page
Category grid/list/catalog view
Shopping cart
Make sure by default your minimum order quantity is your interval order quantity.
Case 5
Configure Interval Order Quantity, Minimum Order Quantity on the product.
Check this product on following pages:
Product page
Category grid/list/catalog view
Shopping cart
Case 6
Configure only Maximum Order Quantity on the product.
Check this product on following pages:
Product page
Category grid/list/catalog view
Shopping cart
KOD-21118: Add Recently Ordered Product Feature
KOD-21119: Add sendInvoicesInBulk setting to company patch endpoint and readDetails endpoint
KOD-21125: AD PIM Integration - Add products as a Vendor products
KOD-21127: Update apps
KOD-21126: Implementation - Fix Branch Name
Regression Tests
Case 1
Please test that product list/product details pages are displayed as usual.
Case 2
Please test that we still can see inventory and the main warehouse changes depends on shipto selected.
Tests
Case 1
Please test that we have the warehouse name instead of ‘branch’ as the main warehouse on inventory section.
KOD-21137: Implementation - Request custom Item
Regression Tests
Case 1
Add some products to cart.
Confirm those products are displayed on the cart page.
Change some information.
Confirm everything works as expected.
Tests
Case 1
On the operations portal navigate to the products screen.
Open Detail page.
Add new product with “NONSTOCK” code.
Confirm this product is displayed on the Search Tab.
Add “Displayed” column to the Search screen.
Go to the cart on the commerce site.
Confirm “Request custom item” button is displayed.
Change fields (only one per next step):
Code
Active
Displayed
Go to the Search tab and if:
Code changed
Product is not visible
Displayed column changed
Confirm “Request Custom Item” button is not displayed
Case 2
Enable “Request Custom Item” button.
Click on this button.
Add custom product to the cart.
Confirm product is visible on the first cart’s tab
KOD-21140: Add host code column to shipping methods screen
Regression Tests
Case 1
We need to go to Shipping Methods.
We can test the Show / Hide Columns button, as well as the search bar of the column fields and the redirection to the details screen.
We can also check the editing functionality of the fields.
Tests
Case 1
For this test, we need to go to Shipping Methods, go to the Show / Hide Columns button and select the new Host Code column.
You’ll need to be able to see the new column, search for an option and select it and use the filters with that column.
You can also reload to make sure that the information was saved.
Case 2
For this test, we need to go to Shipping methods > Select a shipping method and after you scroll down you should see the new Host Code field under the Method Type field.
You’ll need to be able to edit it and see if the changes are saved.
KOD-21148: Implementation - Home Page Tweaks 2
KOD-21149: Change logo for the Payment Confirmation
KOD-21151: Payment Buckets not Matching to SX
Tests
Case 1
Turn on new setting.
inforCSDUseV2ArBalancesInterceptor - this should run a new V2 interceptor arBalancesInforCSDV2.js
To include extra transaction types - use inforCSDOpenInvoicesExtraTransactionTypes setting: to add Unapplied Cash (UC) records - set setting value to 3.
Check invoices balances and if invoices total in each bucket matches period balance.
KOD-21159: Melt Form Updates
Regression Tests
Case 1
For both a logged in and logged out user, you should be able to still submit the form.
Tests
Case 1
For a logged out user, the sales rep dropdown should now be visible and user should be able to select an option (Other is still the defaulted option).
KOD-21161: Implementation - FAQs fix
KOD-21166: Create generic template for email blast
KOD-21169: Implementation - Load Skus data
KOD-21170: Include Unapplied Cash Records
Regression Tests
Case 1
Open Invoices screen is loaded in Customer Portal, Open Invoices records displayed.
Case 2
Open Invoices screen (of Company) is loaded in the Operations Portal, Open Invoices records displayed.
Tests
Case 1
Set global setting inforCSDOpenInvoicesExtraTransactionTypes = 3.
This should include Unapplied Cash records and return them on Open Invoices screen in Customer Portal and in the Operations Portal.
KOD-21171: Implementation - Warehouses
KOD-21174: Create ux grid for orders notes
Regression Tests
Case 1
You can easily navigate between different screens in search bar.
Tests
Case 1
Check that new page Order Notes is in the system and you can easily redirect to that page.
Also, please test that page looks good without any problems.
Case 2
On Order Notes screen test basic CRUD operations:
Create
Update
Delete
Case 3
On Order Notes screen test filterable and sortable for all fields.
Case 4
On Order Notes screen try to go to details page using arrow on the right. Details page should looks good without any problems.
Case 5
Order Notes screen → Order Note detail page.
Please test that you can update fields and it will be saved.
KOD-21179: Implementation - Customer Portal
KOD-21181: Skip CSD print request if no printer is defined