Ability to show Proof of Delivery when generating PDFs
When you generate an internal PDF for orders, company orders, cash quotes, and order documents in the Operations Portal, you can now choose if you want to display Proof of Delivery (POD) within the PDF.
When you initiate a PDF download, a new section will appear in the pop-up box titled “Display proof of delivery” with a dropdown field that is required to complete before downloading. You will be able to select “Yes” or “No”; however, “No” will be the default. If you choose “Yes”, the PDF file will include a POD column titled “Delivered” which will provide information on the quantity of items delivered. This will help you determine if the full amount of items were delivered or if you received a partial order. Based on your system configuration, you can also choose to display other proof of delivery information; such as signatures, delivery pictures, etc.
Watch the video below to walk through the new ability:
https://youtu.be/vF-qheGPHlY
Search tab on Customers screen now sortable and filterable
You can now sort and filter the Customers screen by the fields found on the Search tab. This will allow your team to further customize the screen to be able to view the data they need.
You can sort and filter by the fields on this screen the same way you would on other screens found in the Kodaris Platform. Watch the video to see how:
https://youtu.be/fcUn1VxzCto
Mobile App
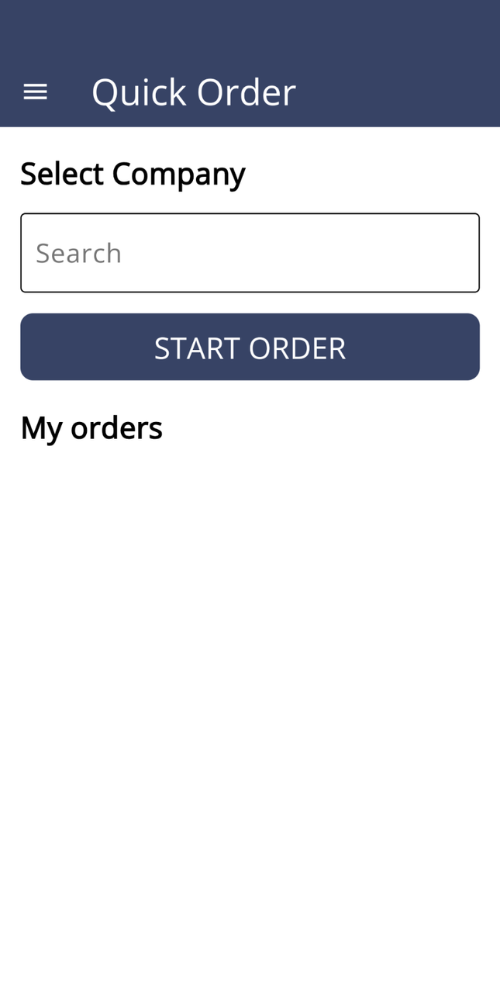
Quick Order feature added to Employee Mobile App
You can now place orders via the Quick Order feature on the Employee Mobile App! By knowing the names or SKUs of the products you want to order, you can use the Quick Order feature to place an order in just a few clicks, which greatly reduces the time it takes to place an order. Quick Order is conveniently located on the mobile app’s main navigation, readily available for your team to place orders on behalf of your customers while on the go.
Check it out in the images below, or download the app to see for yourself! If you haven’t downloaded the mobile app yet, head to the App Store or Google Play, search “Kodaris Employee Portal”, and download the app with the Kodaris logo. To log in, enter your company’s domain/URL, your username, and your password. Your credentials will be the same as what you use to log into the desktop version.
Swipe and zoom features added to products images in Customer Mobile App
On the Customer Mobile App, we’ve added the ability to swipe between product images when there are multiple available and zoom in on product images. Users will now be able to swipe left and right and pinch to zoom. If there are multiple images available to view, you will see a carousel slider as an indicator.
This update affects the image(s) on all product Details pages. Take a look at the examples below, and check out the updates for yourself in your Customer Mobile App!
Tickets
KOD-17921: Customer App - Deeplinking Updates
Tests
Install app.
Open app details screen in settings.
Scroll down to “Open by default”.
Press “+ Add link”.
Confirm, that link shown corresponds to the installed app.
Tick this link and press “Add”.
Case 1
Confirm that you’ve completed pre-requirements for your device.
Open app.
Press “Forgot password?” text on main screen.
Enter your email.
Press “SEND EMAIL” button.
Go to you mail, find message from your website about password reset.
Press on the given link.
The app should be opened instead of browser.
You should see “Set password” screen.
Case 2
Complete case 1 before doing this case. This case will start from “Set password” screen.
On the “Set password” screen press “save” without any password.
You should see message “Please enter Password”.
Case 3
Complete case 1 before doing this case. This case will start from “Set password” screen.
On the “Set password” press enter some “bad” password (for example, less then 8 characters).
Press “save”.
You should see message, about what you did wrong.
Case 4
Complete case 1 before doing this case. This case will start from “Set password” screen.
On the “Set password” screen enter “good” password.
You should be redirected to the screen, that password was set correctly.
Try to login with new password.
KOD-18192: Kodaris - Ticket Number At Top Left
Regression Tests
Case 1
Make sure that all Tickets/Activities pages work and look correctly.
Tests
Case 1
For all Tickets/Activities Details pages should contain ticket.code at top left corner, not ticket.number or ticket.id.
KOD-18198: Add Search on Accounts Payable screen - UX
Regression Tests
Check that the records are displayed correctly on the data tab.
Tests
Case 1
Check that the records are displayed correctly on the search tab.
Check that the table on the search tab allows you to enable/disable additional parameters (columns).
Check that when updating the table on the search tab, the api/system/accountsPayable/search method is called.
KOD-18274: Implementation - Order templates
Tests
Case 1
Log into the Operations Portal.
Navigate to orders and choose any order.
Check if for this order present Custom Records.
Click on ‘Email Order’ and 'Configure' to see how email is generated.
Confirm that it’s looks like customer templates.
Case 2
Log into the Customer Portal.
Navigate to orders and choose any order.
Check if preview is alike as customer template.
Case 3
Log into the Customer Portal.
Navigate to orders and choose any order.
Click 'Print' to generate PDF file.
Check if preview is alike as customer template.
KOD-19378: Read in ICSL Table for Nonstocks
KOD-20844: Employee app - Quick Order
Tests
Navigate to QuickOrder screen through the Drawer menu.
Search and select the Company.
Tap Start Order.
Open Recent order.
Create order.
Navigate to Quick Order screen through the Drawer menu.
Select the recent order from the list.
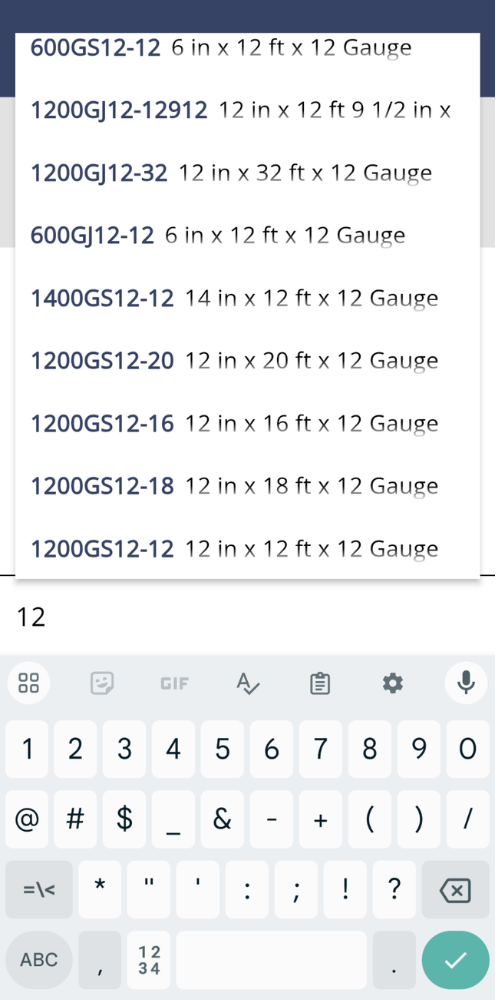
After creating or opening existing Order find yourself on Cart screen.
Search products & add them to an order.
Optionally change items quantity in the dialog box or items list.
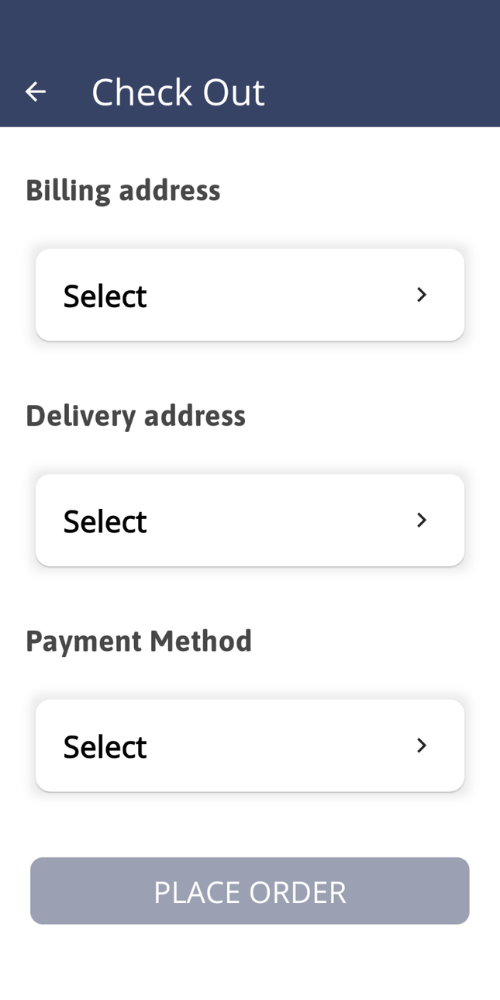
Tap Check Out.
Fill in Billing address fields (choosing an Organization will update values in the form) & tap Save.
Fill in Delivery address fields or check Use as Delivery Address checkbox below the Billing section.
Choose Payment type: when Pay via email link is selected - additionally fill an email field. Tap Save.
Tap Place Order.
KOD-20864: Implementation - Midland Product Data
KOD-21341: Insert Tote Codes Not In SX
KOD-21366: Surcharging Solution: handle non-surcharge states
KOD-21386: Implementation - Website Updates
Regression Tests
Case 1
Check that the data in the fields of the billing and shipping addresses blocks is filled in.
Check that when changing the address in the shipping address block, the address fields will change correctly.
Check that if you create an order by the customer , then wait until the end of the customer session and place an order again - in the checkout the shipping and billing address fields will be pre-filled, similar to the data of the previous order.
Check that if you create an order by the customer, on the page with these orders in the ship to section the state code is displayed, similar to the state specified on the page for filling out the shipping address.
Tests
Case 1
Check that the data in the fields of the shipping and billing addresses blocks is displayed in uppercase format.
Check that the dropdown in the “Search for a shipping address“ field contains company name and address.
KOD-21423: DDA App Compatibility Updates
KOD-21488: Add Product's Attributes to the Specs
Regression Tests
Case 1
On the commerce site search for products.
Apply some filters.
Filters are applied properly.
Navigate to the any product detail page from the search page.
Confirm page is loaded properly and tabs are clickable.
Repeat this steps as logged in user.
Case 2
Select any product on site.
Navigate to it’s detail page.
Confirm Specs tab is displayed and clickable.
If there are no specs on the product, confirm “There are currently no specs for this product.“ message is displayed.
Find product with specs provided or add specs to the selected product.
To add specs navigate to the operations portal to the products screen.
Find your product by product code.
Navigate to the specs tab.
Add specs.
Navigate back to the product page.
Confirm specs are displayed.
Tests
Case 1
On the operations portal navigate to Filter Categories Screen.
Select any category.
Find ProductDisplay field.
On the attributes tab find any product assigned to this attribute by clicking on it.
Find this product on the commerce site.
Navigate to the product’s detail page.
Open specs tab.
Confirm attribute is displayed if productDisplay field on step 3 is equal to 3.
Update ProductDisplay value to false.
Confirm this attribute is no longer displayed on product details page.
Case 2
Add attributes and specs for any product.
Confirm attributes are displayed above the specs under the specs tab.
KOD-21571: Units Switching on Site when Page is Refreshed or Navigate from and Back to
Regression Tests
Case 1
Go to the category page and confirm that everything works without errors.
Go to a product page with the units select dropdown and confirm that everything works without errors.
Confirm that when searching for a product with a units select dropdown on the search page, everything displays without errors.
Case 2
Confirm that in our units select dropdown on the category or product or search pages:
The options in select are identical in all pages.
The options match those from the `api/user/product/pricesByCodes`(open the devtools, open the network tab, find that endpoint and open the response) endpoint: all values from unitConversion plus the default unitSell.
If the default unitSell is present in the unitConversion array, it should not appear twice in our dropdown, only once.
Case 3
Open a product page where there is no units select dropdown and confirm that in the `api/user/product/pricesByCodes` endpoint, unitConversion is either empty or consists only of our default unitSell.
Tests
Case 1
Confirm this on the category, product, or search page:
After refreshing the page, the units select options remain the same and do not change order.
If we check the `api/user/product/pricesByCodes` endpoint and see that our default unitSell is in the unitConversion array but is not the first element, confirm that it will still be selected in our select dropdown and appear as the first option.
KOD-21574: Implementation
KOD-21595: DDA App - Embed a Map view of the deliveries / stops
Regression Tests
Case 1
Test if trip details are displayed correctly.
Tests
Case 1
Test map with multiple deliveries.
Once you scroll down to the bottom of the page, you should see all existing locations on the map. Location, that were not found, will not be shown to driver.
Case 2
Test map with exactly one delivery.
You should see one location with good pudding to clearly see where it is.
NOTE 1:
To add delivery with locations you should do this:
Go to the operations portal → Trips.
Choose existing trip or create new one. Open this trip.
On the opened Trip go to deliveries tab.
Enable next fields to be shown: Address 1, City, Postal Code, State, Country.
Search on google maps find any actual address and fill in data.
Save edited delivery or create new one with this data.
KOD-21600: Add ability to mass delete filter categories by import
Tests
Case 1
Create or update a new entity from the import (it doesnt matter if you populate the sourceModifiedTime or not. But make sure you have ‘isSourceDelete’ in false)
Then, try to delete that entity populating a sourceModifiedTime with an older date that current time. For instance, try just put an old sourceModifiedTime: 2024-03-05 02:10:00:311.
As a result, the entity should not be deleted since the sourceModifiedTime is older than the lastModifiedtime from the entity.
Then, try again deleting the entity but this time use current date as sourceModifiedTime (Check the server time to be sure which format to used).
As a result, the entity should be deleted. (If not, take a look to the events where the error should appear)
Case 2
Now we will try to create an entity which was deleted before.
In case 1, you created an entity and then you deleted.
Now try create it again but using a sourceModifiedTime older than you used in the case 1. So, try using an old sourceModifiedTime (Like 2024-03-05 02:10:00:311).
As a result, since the creation is supposed to be created in May but the deletion happened in September (supposing that it was run during this month), the creation is skipped.
KOD-21654: DDA Add recent trips view to home screen
KOD-21697: Google Analytics Report with 404 Results
Tests
Case 1
Please test that if we have an error with code 404 we will have ‘Page not found’ in the title of tab.
KOD-21747: Customer App - Add multi image viewer to product details view
Regression Tests
Case 1
Verify that the product detail view displays:
The individual image if there is only one, the placeholder if there is none, and the slider view if there is more than one.
Tests
Case 1
Go to the product details screen and if the product has multiple images, verify that it shows a slider view with dot indicators that match the number of images.
If you click on the image it will show an enlarged view of the image as a carousel. This applies to a single image or several, the view supports zooming in and out with touch gestures.
If the product has no images, the default placeholder is displayed and is not zoomed.
KOD-21751: Order Email Isn't Editable
KOD-21755: DQ Delivery Sync - Handle data changes on stops and trips
KOD-21759: Cash Quote Product Groups - Allow Order Item Type to be Free-Handed
Regression Tests
Case 1
On the following tabs:
Order Items
Quote Items
Cash Quote Items
Make sure that grids loaded with no issues.
Each field is flaced in the corresponding cell on the grid. If field is editable you should be able to edit that field.
Tests
Case 2
On the Tabs from Case 1:
Add to the grid “Type” column.
When you click on any cell within this column, make sure there is dropdown with values that are coming from the orderItemTypes setting.
When you click on each of those items you select them, and when you click outside of the cell, your selected value is saved.
Try typing within this column. Make sure your typed value is saved when you click outside of that column.
KOD-21761: Implementation - Nonstocks for Cash Quoting
KOD-21771: New POST endpoint for Order Document
KOD-21774: Add new sales reps to form
KOD-21776: Requested Parser Updates
KOD-21780: Implementation - AP Automation
KOD-21782: Add Terms to POD Email Sent to Customer
Regression Tests
Case 1
Order Email should still work as normal.
Tests
Case 1
When choosing to display POD on order email, you should see the correct terms at the bottom of the email.
KOD-21784: Move a vendor invoice to a different Vendor
After passing a vendorInvoiceID and vendorID (Company), the invoice order should be link to the correspondent company.
If the vendorInvoice ID is not a valid Vendor Invoice or the vendorID is not a valid Vendor company, error should be thrown.
If the user is trying to assign a Vendor which is already assigned, an error should appear.
Besides the company, the following billing fields should be copied from the company:
Organization
Address1
Address2
Address3
City
State
PostalCode
Country
Phone1
Phone2
Email1
Email2
KOD-21785: Update Credit Status Change Email
KOD-21788: Add ERP Order Number to COD Payment Page
Regression Tests
Case 1
Check that COD payment link still looks good and it’s sending without any problems.
Tests
Case 1
For this case order should not have extra5 field populated.
That means order wasn’t released to ERP.
So you should check that COD page have orderNumber, not an extra5.
Case 2
For this case order should have extra5 field populated.
That means order was released to ERP.
So you should check that COD page have extra5, not a orderNumber.
KOD-21790: Platform for hiding ERP direct shipped products on category, search and details pages
Regression Tests
Case 1
For testing, we want to trigger a reindex in a product and make sure that even though the product doesn’t have an SKU (Or it has but without a warehouse associated), the index happens successfully.
Also, navigate to the search tab and try filter some field to make sure it works.
Note: If all the products has an sku associated you can create a new product or delete the sku for that particular product.
Tests
Case 1
Check that in the search tab for product you can see the new fields
"directShippedByLocation" and "erpDirectShippedByLocation".
The directShippedByLocation will be populated based on the warehouse associated to the Sku. (warehouse.directShipped).
The erpDirectShippedByLocation based on the sku.status. If the erpLogicEngine is ‘InforCSD’, then the value will be true or false depending if the sku.status is 'D' or not.
If the erpLogicEngine is not InforCSD (For example it is Trend), it should be false for all the skus. (Currently only InforCSD can determine if the Sku is directShipped or not).
KOD-21791: Make columns on Customers screen sortable and filterable
Regression Tests
Case 1
Check that customer search screen still loads good
Case 2
Check that you can go to customer details page
Tests
Case 1
Go to customer search screen. For next fields:
address1
address2
address3
assistant
companyCode
companyGroupCode
companyName
customerID
customerGroupCode
customerProductGroupCode
email1
email2
externalCompanyCode
externalID
firstName
hostCode
integrationCodes
lastName
organization
phone1
phone2
position
state
userName
KOD-21793: Google API Key
KOD-21795: Implementation - Registration Page
KOD-21804: Fix Employee Group Role Details Screen
KOD-21805: Optimize removal of expired data
Regression Tests
Case 1
The job has a setting 'limitPerRun' where it limits the amount of entities to be deleted. If not set, it will use 1000 as default.
Orders older than 3 years in its extra4 field (or settingdeleteOrdersOlderThanMonths in job to override it) should be deleted.
In this case, instead of using ‘created’ as the field to check, it uses extra4.
Orders that have no "completed" (complete field is null) date and are "lastModified" more than 90 days ago should be deleted.
OrderShipments older than 3years should be deleted (unless setting in job deleteOrdersOlderThanMonths overrides it).
Payments older than 3 years should be deleted (unless setting in job deleteOrdersOlderThanMonths overrides it).
Tests
Case 1
The job has a setting 'limitPerRun' which is used only for deleting old ORDERS, PAYMENTS and ORDERSHIPMENT.
What we expect after running the deleteOldOrderJob:
If jobPruneEvents is enabled, events created before than 60 days should be deleted (unless the job has the setting jobPruneEventsOlderThanDays which will override it).
User sessions created before 7 days should be deleted (unless the job has the setting deleteUserSessionsOlderThanDays which will override it).
RefreshTokens with no activity in the last 90d should be deleted (field lastAccessed indicates the activity).
DeleteLogEntry older than 90 days should be deleted (unless the job has the setting pruneDeleteLogEntriesJobOlderThanDays which will override it).
Emails older than 3 years should be marked as deleted (unless the job has the setting deleteEmailsThanYears which will override it).
If setting jobPermanentlyDeleteEmails is enabled, setting jobPermanentlyDeleteEmailsOlderThanDaysAgo will be used to determine how old the emails marked as ‘deleted’ will be deleted permanently.
KOD-21816: Operations Portal - Display message on successful order split
Regression Tests
Case 1
Navigate to Orders → select an order → make sure order page still loads.
Case 2
Find an order that only has regular products (not a direct order) and has not been released to the ERP yet → click the split direct order button → notice nothing happens/no errors occur.
Case 3
Find an order that already is direct shipped and has not been released to the ERP yet → click the split direct order button → notice snacker appears with the following ‘Order has been converted to a Direct Order'.
Tests
Case 1
Find an order that has multiple items that need to be split → click the split direct order button → notice you will be routed to the back orders tab as well as a snacker will appear saying ‘Order has been split successfully’.
Case 2
After case 1 is complete, click into one of those back orders → make sure on the custom fields there is orderFrom (or add if needed) with value of orsnasco for testing purposes.
Click on the Release Order to Vendor button → notice a snacker will appear with the message 'Order [order #] has been released to vendor'.
KOD-21822: Add POD feature to the PDF
Regression Tests
Case 1
Following endpoint should continue working as expected and showPODFiles shouldn’t be true.
/api/system/order/{orderID}/generateInternalPDF should be able to receive a new request parameter: ‘showPODFiles’ by swagger and also by server side.
Example of code to run in User Scripts:
var result = scriptServiceUtils.runAPIMethod('POST', '/api/system/order/{orderID}/generateInternalPDF', {"orderID": 205}, {hideTotals: false, sortItemsBy:"line", showPODFiles: true} , null);
KOD-21823: Allow user in ops portal to show pod when generating pdf
Regression Tests
Case 1
Vendor Invoice:
Go to AP Vendor Invoices → Click into an invoice → generate file → internal pdf → options should not have changed -> click generate → pdf should be generated and you should be navigated to the internal pdf tab.
Case 2
Vendor Invoice:
Go to Vendors → Click on a vendor → go to the invoice tab → click into an invoice → generate file → internal pdf → options should not have changed → click generate → pdf should be generated and you should be navigated to the internal pdf tab.
Case 3
Quote Entry:
Go to Quotes → click into a quote → generate file → internal pdf → options should not have changed → click generate → pdf should be generated and you should be navigated to the internal pdf tab.
Case 4
Go the following screens and make sure the pages/tabs still load correctly:
Cash Quotes
Orders
Orders → click into an order.
Companies → click into a company.
Case 5
Make sure the customer pdf is still working.
Follow the steps in the regression and test cases to get to the places that can generate customer pdfs
Vendor Invoice place 1
Vendor Invoice place 2
Quote Entry
Company Orders
Cash Quotes
Order Docs
Order
Tests
Case 1
Company Orders:
Click on Companies → click into one → orders tab → select however many orders → click the more button up top → click download selected orders as internal pdf files → notice new section of Display proof of delivery → select yes or no (defaults to no) → update any other options → click generate → notice in the network call now contains showPODFiles as a query param as well as the pdfs downloaded to your computer.
Case 2
Cash Quotes:
Go to Cash Quotes → click on one → Generate File → Internal PDF → notice new section of Display proof of delivery → select yes or no (defaults to no) → update any other options → click generate → notice in the network call now contains showPODFiles as a query param as well as you get navigated to the internal files tab with the generated file in the list.
Case 3
Order Docs:
Go to Orders → select however many orders → click Actions → download selection as internal pdf files → notice new section of Display proof of delivery → select yes or no (defaults to no) → update any other options → click generate → notice in the network call now contains showPODFiles as a query param as well as the pdfs downloaded to your computer.
Case 4
Order:
Go to Orders → click into an order → generate file → internal pdf → notice new section of Display proof of delivery → select yes or no (defaults to no) → update any other options → click generate → notice in the network call now contains showPODFiles as a query param as well as you get navigated to the internal files tab with the generated file in the list.
KOD-21829: Tag EFT Payments for Filtering on AR Screen
Tests
Case 1
Test making payments with EFT provider and setting CC Type on new bank account payments as 'Checking'.
KOD-21833: Tendered invoices do not appear to be paid
KOD-21852: Display custno in invoice email subject
KOD-21853: Lockbox file issue
KOD-21855: Operation Portal - Fix some screens
Regression Tests
Case 1
Check that you can still navigate during different tabs and it’s still working.
Tests
Case 1
Check that you cannot find search rule page.
Case 2
Check that you cannot find search - beta page but can find search screen.
KOD-21856: Search Rules Step 3
Regression Tests
Case 1
For this test you should go to Search > More.
You can change the value of the select fields. Everything should be saved properly.
Tests
Case 1
For this test you should go to Search > Search Rules, click on the arrow. You should be redirected to search/search-rules/{searchRuleID}.
When you click on the Search Rules breadcrumb, you should be redirected to search/search-rules.
Case 2
For this test you should check that on Synonyms, Replacements and Category Redirects screens there is no arrow on the right to go to details anymore.
You should also see that the ID columns were renamed and are also hidden as default.
KOD-21859: Add google analytics
Tests
Case 1
Go to site → right click and view page source → if its a public page and googleAnalyticsMeasurementID is set, then you should see the google tag manager scripts present.