You can now create and save templates for Tickets that you can re-use in the future. Once a ticket template is created, you will be able to create new tickets from existing templates. This feature can be useful if you enter similar tickets often. With templates, you can pre-fill fields so that you no longer have to re-enter the same information per ticket, saving you time and manual effort.
Watch the video below to learn how to add new templates and how to create a new ticket from a template:
https://youtu.be/OjQaCq1SqMY
Resend emails directly from Emails screen
You can now resend emails directly from the Operations Portal. The functionality is available on the Emails screen and can be executed by clicking on the “Resend Email” icon next to each email you want to resend.
Watch the video below to learn more:
https://youtu.be/urKdlHy949g
Import “Assignees” on Companies
Using the import capabilities found in the Operations Portal, you can now import employee assignments on Companies. Instead of manually adding users, or employees, as “Assignees” per Company, you can now do this via the import feature.
Watch the video to learn how:
https://youtu.be/31C_YiqPjtY
Assignees automatically added to newly added Companies in CRM
In the Kodaris system, you can assign employees to companies and restrict their access to only the companies that you assigned to them.
In this release, we've added a new feature that automatically assigns such users to any company they create. When becoming an assignee of a company, the user will receive notifications regarding the company if they have notifications enabled. Keep in mind that Assignees can easily be removed or added to any company.
Refer to this video to see how restricting access to companies works:
https://youtu.be/8-Ea2p7G5CQ
And this video to see the new feature:
https://youtu.be/Pi3SkJbJ-l4
“Digital” field filterable on Products screen
On the Products screen in the Operations Portal, the “Digital” field is now filterable. This applies to the Data tab, Category Assignment tab, and the Attribute Assignment tab.
Learn more about this feature by watching the video:
https://youtu.be/vsmAadeR4a8
Additional sorting and filtering capabilities added to Accounts Receivable screen
The following fields on the Accounts Receivable screen are now sortable and/or filterable:
Amount: Filterable
Check Number: Filterable
Code: Filterable
Company ID: Filterable
External Order Number: Filterable
Payment Date: Filterable
Payment ID: Filterable & sortable
Shipto: Filterable
Status: Filterable
Txn Type: Filterable
Value 2: Filterable
Check out this video to see a demonstration of the new filtering and sorting capabilities relating to the fields listed above:
https://youtu.be/naU9duAwvdw
Mobile App
“Quantity Pricing” available in Customer Mobile App
When a product contains price breaks, users logged in to the Customer Mobile App will now be able to see the “Quantity Pricing” section under a product’s Details page. This will only apply to products with configured price breaks.
Take a look at the image below, and check out the updates for yourself in your Customer Mobile App!
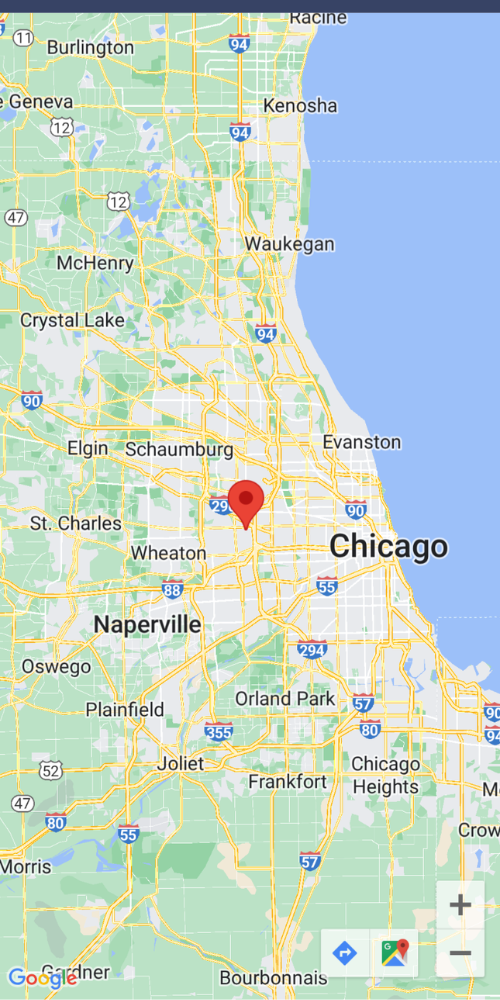
Map view added to Jobs/Leads entries in Employee Mobile App
In the Employee Mobile App, the Jobs/Leads entries contain address fields. Once an address is added, a map will now appear under the “Location” section. Users can tap on the map to open a larger view, and from there, they can continue to browse the map or opt for receiving directions.
Check out the images below, or download the app to see for yourself! If you haven’t downloaded the mobile app yet, head to the App Store or Google Play, search “Kodaris Employee Portal”, and download the app with the Kodaris logo. To log in, enter your company’s domain/URL, your username, and your password. Your credentials will be the same as what you use to log into the desktop version.
Recent history added to Employee Mobile App
Historically, the Employee Mobile App offered a “Recently visited” area on the Dashboard screen that included your most recently visited sections of the app. While this feature still exists, we’ve added an enhancement that includes quick access links to specific pages you’ve recently viewed on the Dashboard screen.
For example, if you were to tap into a specific ticket under the Tickets screen in the app, that individual ticket would then be available on the Dashboard screen as a recently visited item.
Check it out in the image below:
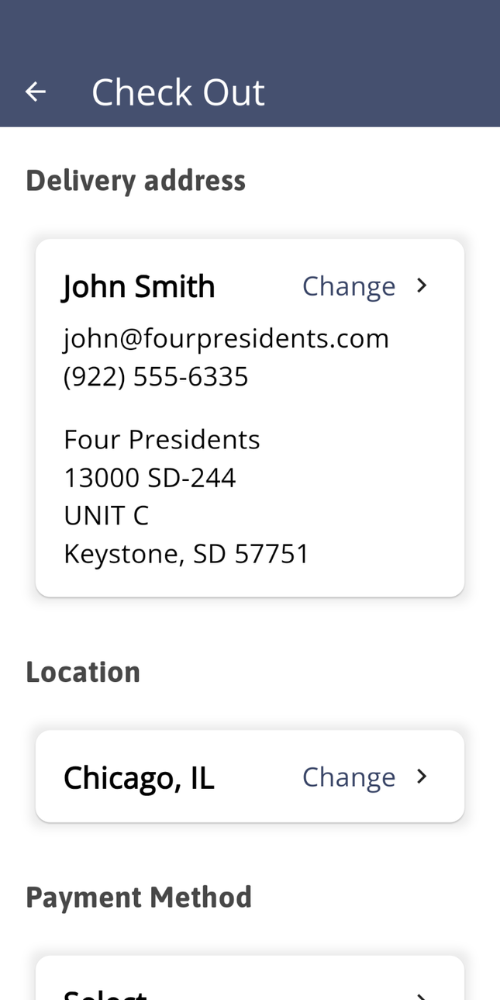
“Location” selector added to checkout screen on Employee Mobile App
On the checkout screen in the Employee Mobile App, a selector titled “Location” has been added. Similar to the checkout experience in the Customer Mobile App, this ability will allow users to pre-select the location/warehouse for the order before checking out.
See the image below to learn more about the feature:
Barcode scanner added to the Employee Mobile App
A barcode scanner has been added to the Inventory, Pricing, and Quick Order screens in the Employee Mobile App. The scanner will use your mobile device’s camera to capture a product’s barcode and then apply the product to the screen.
See where the barcode scanner is located on each screen in the images below:
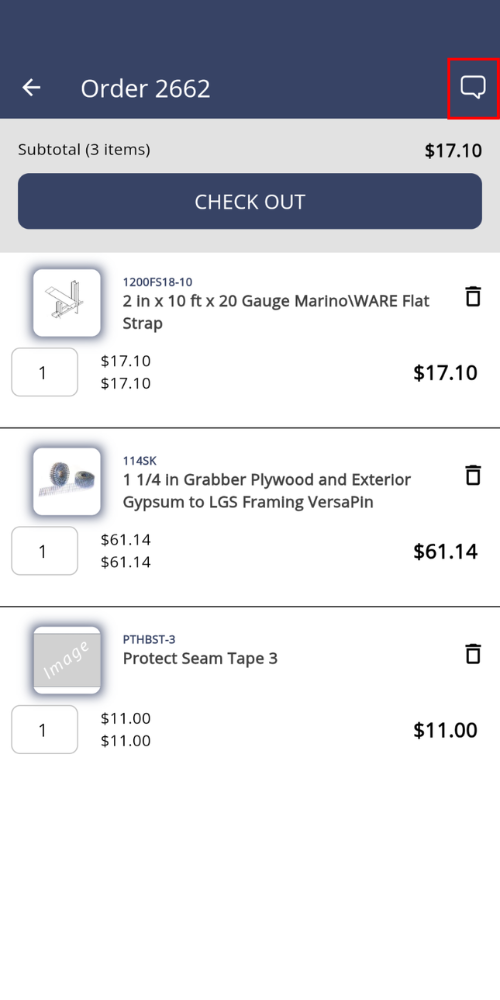
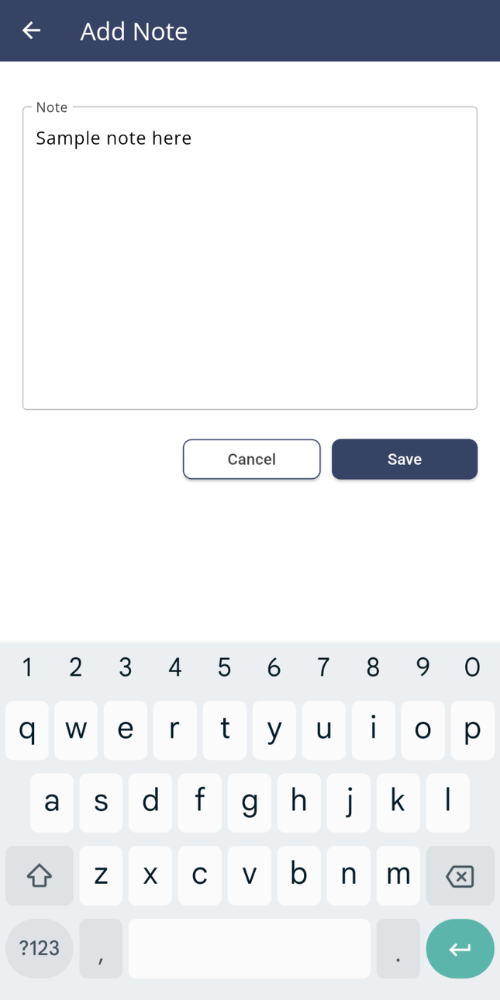
Notes feature added to Quick Orders in the Employee Mobile App
When using the Quick Order feature in the Employee Mobile App, you can now add a Note to an order before checking out. The Notes section is not mandatory but can be used to communicate information with anyone who can view the order once it’s placed.
Check out the new ability in the images below.
Create new tickets directly from Tickets tab under a Company
In a recent release, the “Tickets” tab was added to the Company Details screen on the Employee Mobile App. This tab shows any tickets related to the chosen company. If a ticket exists, you can click into the ticket and view the ticket information.
Now, you have the ability to create new tickets directly from the Tickets tab under a Company. To do this, a “+” icon is available in the bottom right corner of the screen that will allow you to initiate a new ticket.
Check out the image below to see how you can add a new company-specific ticket using the Employee Mobile App:
Tickets
KOD-17477: Restricting users to view the documents in the credit app
Make some changes, like update status, change item deliveries, upload pictured, etc.
Close the app.
Enable internet connection.
Go into the app using auto-login feature.
Your unfinished requests should be finished within 1-2 minutes of entering the app.
Tests
Case 1
Open DDA App.
Go to some Trip (to see it’s Details).
Disconnect you phone from internet connection.
Make some changes, like update status, change item deliveries, upload pictured, etc.
Go back to trips screen.
You should see warning message, that request is pending. Once you click on it, you should see Queue Manager with all unfinished requests.
Once you click on any queue, you should see details of this queue with Json requests. You should be able to copy this Json request by Copy button.
Case 2
Open DDA App.
Go to some Trip (to see it’s Details).
Make some requests fail. For example, making requests to the server, when it is deploying and not accessible (no internet connection is handled before request fires).
You should see red alert on the Trips screen.
If you press on it, you should see Queue Manager and error near the failed queue.
Click and test Queue Details screen as well.
KOD-22382: ERP and Warehouses
KOD-22386: Add, edit, delete unit converesions in kodaris
Regression Tests
Case 1
Check that the news on the Unit Conversions page looks correct, the fields in the table are filled in, deleted, edited.
Check that there are no errors in the console.
Tests
Case 1
Check that the ProductID column is autocomplete.
Check that the search in the ProductID column works correctly.
Check that editing the value in the ProductID field works correctly.
KOD-22394: Parser - Line Items not being parsed
KOD-22414: Some Customers not receiving emailed invoices
KOD-22420: Check Escalation Units
KOD-22423: Add location selector to Quick Order in the employee app
Regression Tests
Case 1
Go to Quick Orders view, select an order, select checkout button, verify the Check Out view has a new section “Location“ if this is selected a bottom sheet with warehouses should be displayed.
Verify you can select an option and this change color, verify the option selected has persistence, by navigate back to Quick Orders view an then return to Check Out view for that order.
KOD-22429: Implementation
KOD-22430: Additional Requested Content Updates
KOD-22447: Display cross references for the past orders
Regression Tests
Case 1
For the new orders customer product code is being showed properly in:
Order email
Order pdf
Customer portal → order details
Tests
For the old orders customer product code is being showed properly in:
Order email
Order pdf
Customer portal → order details
KOD-22453: Add DQ endpoint for generating events for testing
Tests
Case 1
New endpoint created: /api/system/integration/dq/mockDeliveryEvents
externalOrderNumbers: Can pass in any valid externalOrderNumber that will be used to link in the created TRip/Delivery/OrderShipment
useSameStopNumber: This is used for determining how many Deliveries creates. If there are different stopNumbers, different Deliveries will be created.
If there is the same stopNumber, only one Delivery will be created unless the Companies from the Orders differ.
processDirectly: If true, Trip will be created instantly. If false, fiveMinuteIntervalJob needs to run.
KOD-22454: New fields needed in Search and config update
KOD-22462: Add other systems
KOD-22464: Set up Commerce Host & Application
KOD-22466: Kodaris - Products not being returned
KOD-22469: Index name and keywords into new search fields
KOD-22491: Careers page
KOD-22493: Spin Up Test System
KOD-22501: Product search on order
KOD-22505: Order Detail Updates
Regression Tests
Case 1
Orders → select order.
Check if you are able to generate internal PDF file.
Check preview of the internal file that you generated especially columns width.
Tests
Case 1
Orders → select order.
Add items to the order and set value to quantityBackorder for the items that you added to the order.
Go to Company from Order Detail view and add some description for “termstypeDescription“ field.
Generate Internal PDF file and check if preview contains data that we provided.
Check all variants of invoice depending on displaying pricing and displaying order totals.
KOD-22504: Update delivery option when changing in the side panel
Regression Tests
Case 1
This sidebar can be accessed on pages:
Product detail
Products List
Cart
These pages should be loaded with no issues.
Case 2
Make sure that the product is sent to the cart from the sidebar and no errors occur.
Tests
Case 1
Click on “Shop By Category“ → Tools.
Find the product that has the ‘Pickup’ option available → click on the store name in the Pickup option.
Add a product to the shopping cart with any warehouse.
Go to the shopping cart and open the Pickup sidebar on the selected product.
Click the 'Change in Cart' button on any other selected store.
Make sure that the warehouse has changed on the product in the cart.
Case 2
Go to the shopping cart and select the delivery option on any of the products.
After that open the Pickup sidebar on the selected product.
Click the 'Change in Cart' button on any other selected store.
Make sure that the warehouse has changed on the product in the cart and the Pickup option is selected instead of Delivery.
KOD-22509: Employee app - Add barcode scanner to all product lookup screens
Regression Tests
Case 1
Go to the inventory section, press the scan QR code button, this will open the camera to scan the QR of a product, then verify:
If the product exists, it will show the inventory result.
If not, an error toast should be visible.
Go to the pricing section, look for the "Product Code" input, press the scan QR code button, this will open the camera to scan the QR of a product, then verify:
If the product exists it will show the code in the input.
If not an error toast should be visible.
Go to the Quick Order section, select an order, in the bottom input press the scan QR code button, this will open the camera to scan the QR of a product, then verify:
If the product exists it will show the inventory pop up to add the product.
If not an error toast should be visible.
KOD-22510: Order > Payment > Tabs redirect back to order details
Regression Tests
Case 1
Open an order with Payments -> open a payment page -> confirm that the Customer Files and Internal Files tabs load without errors.
Confirm that we can add a customer file or an internal file and that they appear in the respective tabs.
Ensure that we can open files in these tabs.
Confirm that we can download the files by clicking on the corresponding icon.
Case 2
Log in to the operations portal.
Navigate to the orders screen.
Select order with payment under it.
Click on the clip icons.
After that select “Customer file” and select any file to upload.
Confirm redirection to the “Customer files tab” works as expected.
Confirm file you upload is visible on the control.
Repeat steps 4-7 for the “Internal file”.
KOD-22511: Uploaded Files don't add Line Items
Regression Tests
Case 1
Import of existing product codes with recently added CSV, TSV and XLSX importers should work propery.
Tests
Case 1
Import of items with non existent product codes should be imported with NONSTOCK code.
KOD-22513: Hybrid AI and Text Search
KOD-22516: Customizer - More language issues
Regression Tests
Case 1
Make sure customizer for any language version is loaded successfully.
Make sure it works with no issues: you should be able to update widgets.
Tests
Case 2
Check defaultLocale setting value.
For site language version as in defaultLocale setting:
In Customizer for this language → Open Menu → Click on Header (Or Create Header Menu).
Add some items to the header → Click Activate & Publish.
Make sure you can see updated header on default language version of your site and on other language versions for which you haven’t set up Header Menu.
Case 3
Check defaultLocale setting value.
For site language version as in defaultLocale setting:
In Customizer for this language → Open Menu → Click on Header (Or Create Header Menu).
Add some items to the header → Click Activate & Publish.
2Make sure you can see updated header on default language version of your site and on other language versions for which you haven’t set up Header Menu.
Case 4
Open Customizer in language other than is set in defaultLocale setting.
Follow step 1 from previous case.
Make sure you’re able to see updated version of Header Menu on you site for that language.
Make sure you cannot see those updates for other languages.
Case 5
Note: If you delete some menu (for example header) for any language version - it will be deleted for other languages too.
Delete header menu if it was created before.
Add new Header Menu for default language version of the site. Add there several items. Click Activate and publish.
Make sure you can see those updates on all language versions.
KOD-22519: UX - Add "Order Emails" and "Quote Emails" grids to the operations portal
Regression Tests
Case 1
Open the emails page -> select an email and go to its page -> make sure all tabs work correctly (details - displays email’s information, customer files - shows a table with customer files for this email, internal files - shows a table with internal files for this email).
Case 2
Open the orders page -> select an order and go to its page -> make sure all tabs load without errors.
Case 3
Open the quotes page -> select a quote and go to its page -> make sure all tabs load without errors.
Tests
Case 1
Make sure that on the left menu, we can find links to the “Order emails” and “Quote emails” pages.
Case 2
Go to the "Order Emails" page and make sure the page loads without errors and contains a grid table with order emails.
Confirm that clicking on the eye icon opens the email information and that it matches the information you would see by clicking the eye icon on the emails page for the same email.
Repeat steps 1-2 for the "Quote Emails" page.
Case 3
Go to the "Order Emails" page and open the page for an email from the table.
Make sure the email page loads without errors, and in the details tab, you can see all the information about the email, which should be the same as if you had opened it through the emails page.
Open the customer files tab and make sure it displays a table with customer files, which should be the same as if you had opened it through the emails page.
Open the internal files tab and make sure it displays a table with internal files. Next to each file in this table, there should be:
an eye icon (which opens the file without errors),
a download icon (which downloads the selected file to your computer),
and a "start order" or “view order“ icon.
Ensure that steps 1-4 work the same way for quote emails, except that in the internal files tab, there should be a "start quote" icon.
Case 4
Open any “order email” page and go to the Internal Files tab.
Click on the Start Order icon and confirm that:
f the email has no companyID, a popover should appear where you’ll need to select a company. After clicking Save, an order will be created, and you’ll be redirected to its page.
If companyID exists, the order will be created directly, and you’ll be redirected to its page.
Go back to the order email* page with the Internal Files tab and confirm that the icon on the file used to create the order has turned green. When you click on it, you should be redirected to the newly created order.
Confirm the same behavior for the Quote email page.
Case 5
Confirm that when you click on the Start Order icon and the popover opens, the user must select a company and then click the Save button to start the order.
If the user clicks Save without selecting a company, nothing will happen.
If the user selects a company and clicks the Save button multiple times, only one request will be sent to create the order.
KOD-22521: Add order and quote automation sections to the company details screen
Regression Tests
Case 1
For this regression test we will go to Companies > Select a Company > Details tab.
We will test the fields to make sure everything is being saved correctly.
We don’t have to test the fields inside the Order Automation and Quote Automation sections for this test.
Tests
Case 1
For this test, we will go to Companies > Select a company > Details tab > Order Automation and Quote Automation sections.
We will test the “Automated Email Addresses” fields on both sections.
First, we will make sure those settings don’t exist for that company by going to Custom Fields.
We will add a couple of emails to the fields and reload. You can add new emails by pressing Enter, Comma or clicking away. Everything should be saved accordingly.
Code should be “orderAutomatedEmailAddresses” and “quoteAutomatedEmailAddresses” respectively.
Value type should be textValue.
Type should be ORDERAUTOMATION and QUOTEAUTOMATION respectively.
We will also try to delete an email that we added and will make sure it was successfully updated as well by reloading the Details tab and the Custom Fields table.
Case 2
For this test, we will go to Companies > Select a company > Details tab > Order Automation and Quote Automation sections.
We will test the “Release Automated Orders/Quotes to ERP” fields on both sections.
First, we will make sure those settings don't exist for that company by going to Custom Fields.
You will see that when those settings don’t exist the default value is “No” or “0” for those fields.
We will then change the value to Yes for both of them and check the changes were applied by reloading the Details tab and the Custom Fields table.
Code should be “releaseAutomatedOrdersToERP” and “releaseAutomatedQuotesToERP” respectively.
Value type should be integerValue.
Type should be ORDERAUTOMATION and QUOTEAUTOMATION respectively.
We will change them to No and verify the changes again the same way.
Case 3
For this test, we will go to Companies > Select a company > Details tab > Order Automation and Quote Automation sections.
We will test the “Use Order/Quote Adapter” fields on both sections.
First, we will make sure those settings don't exist for that company by going to Custom Fields.
You will see that when those settings don’t exist the default value is “No” or “0” for those fields.
We will then change the value to Yes for both of them and check the changes were applied by reloading the Details tab and the Custom Fields table.
Code should be “useOrderAdapter” and “useQuoteAdapter” respectively.
Value type should be integerValue.
Type should be ORDERAUTOMATION and QUOTEAUTOMATION respectively.
We will change them to No and verify the changes again the same way.
Case 4
For this test, we will go to Companies > Select a company > Details tab > Order Automation and Quote Automation sections.
We will test the “Order/Quote Adapter” field.
First, we will make sure that setting doesn’t exist for that company by going to Custom Fields.
We will enter a value to the field and reload the Details tab to make sure it was successfully updated. We will also check in the Custom Fields grid that the setting was created.
Code should be “customerOrderUploadScript” and “customerQuoteUploadScript” respectively.
Value type should be mediumValue.
Type should be ORDERAUTOMATION and QUOTEAUTOMATION respectively.
We can also try erasing the content inside the field and reload the page. Setting shouldn’t disappear in the Custom Fields grid but value should be empty now.
Case 5
For this test, we will go to Companies > Select a company > Details tab > Shipping section.
We will change the value of the Outbound Freight.
When the value is null, the field should be empty. If the value is true, you should see “Yes” being displayed. If the value is false, you should see “No” being displayed.
Case 6
For this test, we will log in as a user with no access to company settings.
We will go to Companies and select a Company.
Inside the details screen, you shouldn’t be able to see the Order and Quote Automation sections.
Also, if you open the Network tab, the endpoints to read the setting should not be called at all.
KOD-22527: Create Ticket Templates screen and add ability to create a Ticket from a template
Regression Tests
Case 1
For this regression test, we will go to Tickets screen.
We will click on Add ticket.
We have to make sure that it’s possible to add a ticket without a template.
After we create a ticket without a template, we will check that none of the fields are prefilled, only title that you've provided should be set.
Case 2
For this regression test, we will go to Activities screen.
We will click on Add activity.
We have to make sure that it’s possible to add an activity with and without a template.
After we create an activity without a template, we will check that none of the fields are prefilled, only title that you've provided should be set.
After we create an activity with a template, we will check that the fields from the template were prefilled correctly.
Tests
Case 1
For this test we will go to Ticket Templates screen.
We will make sure that Ticket Templates items are being displayed in the grid.
Also, we need to make sure that it’s possible to add a ticket template.
We will click the Add ticket template button in the top right corner, observe the dialog being opened, first we will close the dialog by pressing Cancel, then we will open the dialog again and this time we will enter a template name and click on Add.
You should be redirected to Ticket template details screen.
Make sure that the template was added successfully by going back to the grid and reloading.
Ticket Type should be “TicketTemplate”.
Case 2
For this test, we will go to Ticket Templates screen.
We will click to see the details of an item.
We will test the editing of the fields.
Case 3
For this test, you need to have completed Case 2 or have available Ticket template items with custom values on the fields.
We will go to the Tickets screen.
We will click on Add ticket button.
We will fill the Title field, filling the Description field is optional. Then we will select a Template.
You should see the ticket template items being displayed in the options in the autocomplete field like this “ticket.code - ticket.title“
We will select an option and click on Add.
We will click on Add, you should be redirected to the ticket details page.
Make sure fields were prefilled in according to the selected template.
If you filled the description field you should see that value inside the Description input, if not you should see the Ticket template description value in that field.
We will go back to the tickets screen and reload to make sure our ticket was created successfully.
Case 4
For this test, we will go to Tickets screen.
We will click to see the details of a Ticket template item.
This screen should be the same as if you go to Ticket templates > Ticket template Details.
We will click on the tabs to make sure we are being redirected successfully to all of them.
We should test the adding functionality on the tabs that allow us. For example: Product Lists, Customer Comments, Internal comments, Customer Files, Internal Files and Custom Fields.
Breadcrumbs should’ve changed to Ticket templates / {ticketID} .
Clicking on Ticket templates breadcrumb should redirect you to the Ticket templates grid.
KOD-22535: Main site - Product details page
KOD-22543: PIM Products - Make Digital Column Filterable - UX
Regression Tests
Case 1
Check that the Data tab, Category Assignment tab, and Attribute Assignment tab look correct.
Check that there are no errors in the console.
Tests
Case 1
Check that the Digital column is filtered correctly for the Data tab, Category Assignment tab, and Attribute Assignment tab.
KOD-22547: Check on Payment Portal Only Set up
KOD-22553: Stock display
KOD-22554: Cart Item Units
KOD-22556: Initial Setup - Spin up system
KOD-22562: Template update
Regression Tests
Case 1
Generate Order PDF for template with or without signature attached to Customer Files.
Make sure generated template can be opened and loaded with no issues.
Make sure each piece of info is placed where it should be within the generated PDF.
Tests
Case 1
Find an order which has in Customer Files file with type ScannedInvoiceSignature.
Click Generate File → Internal PDF.
In generated Internal File make sure signature image is not taking too much space within the signature section.
KOD-22563: Add specs to product page layout
Regression Tests
Case 1
On product page of the product which has/doesn’t have some specs set up:
Make sure page is loaded with no issues.
Make sure you’re able to add product to the cart, scroll into different sections of the page
Tests
Case 1
For the product which doesn’t have any Product Attributes and Specs imported:
There are no attributes for this product.
Case 2
For the product which has Product Attributes or Specs:
make sure Product Attributes or Specs are shown with no issues.
Case 3
For the product which has specs imported.
Make sure you’re able to see Specs values below the Product Attributes.
In this section Specs should be displayed one row per spec the same way as Product Attributes.
Make sure all available Specs are displayed properly.
KOD-22569: Serial #'s missing on emails
KOD-22570: Setup host URL for customer site
KOD-22574: Implementation - Fix issues
Regression Tests
Case 1
Click on the logo and verify that the user is redirected to the homepage.
Click on the “View Cart” button.
Verify that the user is redirected to the cart page.
Switch to the mobile view of the website.
Click on the toggle button to open the menu.
Verify that the menu opens correctly, displaying all menu items.
Tests
Case 1
Click on the search bar.
Select any product from the dropdown menu.
Verify that the text in the search bar is displayed in white color after selecting an item.
Repeat steps on different screen sizes.
Case 2
Verify Header Compliance with Design.
Verify that “View Account”, “Log Out”, and “Sign In or Create an Account” elements are displayed as per the design on a small screen.
Check that there are appropriate top and bottom paddings between the logo and the header elements, matching the design.
Click on “Sign In” and confirm the following:
A pop-up form for login appears.
The arrow pointer for the pop-up is correctly positioned below the Account section, not the Cart View section.
Case 3
Verify “View Account” Does Not Trigger Login Pop-Up.
Click on “View Account”.
Verify that:
The user is redirected to the account page.
No login pop-up is triggered.
Repeat steps on both mobile and desktop versions.
Case 4
Verify Counter for “View Cart”.
Navigate to any product category.
Add multiple items to the cart (3 different products or quantities).
Verify that:
* The cart icon counter updates correctly to display the total number of items added.
Repeat steps on both mobile and desktop versions.
Refresh the page and ensure:
The cart counter retains the correct count of items added.
Click on View Cart and verify that:
The items displayed in the cart match the count shown in the counter.
The correct products and quantities are listed.
KOD-22576: Restrict delivery date picker on checkout
Regression Tests
Case 1
Make sure you can still place an order/checkout.
Case 2
On step 3 of checkout, on the shipping and delivery section, the previous days should still be greyed out.
Tests
Case 1
We want to make sure that on step 3 of checkout, if there are specific days for delivery, if its after 2pm est and the next day is an option, it should be greyed out.
You can update those specific delivery days if you go to the operations portal → company addresses → data tab → find the delivery address for your customer → add in column user1 → update the days there.
Now go back to step 3 of checkout → if it is after 2PM est and tomorrow is an option, that day should be greyed out.
Case 2
If it is before 2PM and tomorrow is an option, that value should be selectable.
Case 3
Change the month or year, that delivery date should not be greyed out.
KOD-22584: Generate a unique, not guessable tracking number for Dq public tracking information
KOD-22587: Fix search suggestions
KOD-22597: Can’t add nonstock items to cash quote
KOD-22602: Configure Countries and States
KOD-22609: Icons for the Values Section of About Us Page
KOD-22613: Create Company Employee Assignment importers
KOD-22614: Issue With Tracking Numbers on FEDX Shipment
Regression Tests
Case 1
Make sure you can still view the tracking page when you are logged into the customer portal.
Orders → click into an order → tracking tab.
Case 2
Find an order that has a tracking number (and lots of tracking data) and go to this link:
Notice the tracking page now loads properly with dashes or xx in places where data is not available.
Also the travel history section will not be present since there are no events that have been logged.
Case 2
Go to that same order (the one with a newly created tracking number) but in the customer portal and go to the tracking page → notice the tracking page looks the same as the public tracking page plus there is a signed by field.
KOD-22615: The ability to create a company and be automatically assigned to it
Regression Tests
Case 1
In operation portal, you can create the company clicking this icon.
If you create a Company with just companyEdit role or ‘superuser’ ‘administrator’ roles, make sure you create the company but there is no assignment for the employee.
You need to check all of the alternatives:
The company should not contain insideSalesRepCode populated.
From company screen, employee should not appear in the assignments.
From Employee → Company tab. Company should not appear.
KOD-22619: Fix table formatting issue on the comments screen
Regression Tests
Case 1
Open the tickets screen in the operations portal, navigate to some ticket, and confirm that the ticket page loads without errors.
Ensure that all tabs load without errors.
Case 2
Open the customer comments tab on the ticket page and confirm that the text input field displays without errors.
Confirm that we can add a comment using customization and that the comment displays correctly after saving.
Add a table and confirm that it displays correctly.
Add some text, columns, and rows to the table, modify the text in the table, make it bold and confirm that everything displays correctly.
Confirm steps 1-4 for internal comments.
Tests
Case 1
Open the customer comments tab on the ticket page.
Add a table there and enter a long text in one of the columns so it spans multiple lines.
Add the same long text in the header row.
Add some additional text and click save.
Confirm that a comment appears with the table, where the entire long text displays correctly, without being cut off or having a scrollbar.
Also confirm that other text in the header row is centered, while in the regular rows, it is not
Confirm steps 1-6 for internal comments.
KOD-22621: Update Order Invoice on drop-down on order details page
Regression Tests
Case 1
Make sure everything on the order detail screen still loads.
Case 2
Make sure on an order where you can invoice it, you still can click ‘Invoice Order’ under the more dropdown.
Tests
Case 1
When an order has been invoiced, click the more dropdown and notice the wording now says ‘Order Invoiced’ as well as it being disabled and green.
KOD-22626: Make fields filterable & sortable on Accounts Receivable grid
Tests
Case 1
For this test, we will go to Accounts Receivable screen and click on the Data tab.
We will check the following fields:
Amount: filterable.
Check Number: filterable.
Code: filterable.
Company ID: filterable.
External Order Number: filterable.
Payment Date: filterable.
Payment ID: filterable & sortable.
Shipto: filterable.
Status: filterable.
Txn Type: filterable.
Value 2: filterable.
Also, Active column should display “Yes” or “No” values now, previously it displayed “true” or “false”.
KOD-22631: Add all available fields to Quote Requests grid and create Data tab
Regression Tests
Case 1
For this test we will go to Quote Requests screen.
We will navigate to the Search tab to test the Show / Hide Columns button, the redirect to the details page, the customization of columns, and the Export button to make sure they work properly.
Tests
Case 1
For this test we will go to Quote Requests screen.
We should see that now we have two tabs: Search and Data.
We will navigate to both of them to make sure they work properly.
In the Search screen, the following endpoint should be called:
/api/system/quote/search
In the Data screen, the following endpoint should be called:
/api/system/quote/list
Case 2
For this test we will go to Quote Requests screen and Select the Search tab.
We will test the searching of every recently added field:
Order Type Details, Billing Organization, Parent Order ID, Parent Order Number, Parent Order Type, Billing Phone 1, Billing Phone 2, Billing Postal Code, P.O.,
For this test we will go to Quote Requests screen.
We will navigate to the Data tab.
We will test the editing and deleting functionality.
We will edit some fields in the grid and then go to the Details page to verify the changes.
After that, we will delete a Quote Request item in the grid.
KOD-22632: Can't Attach Customer File to Manually Created Ticket
KOD-22634: Parser
KOD-22636: Cannot modify the quantity of new line item in sources order
Regression Tests
Case 1
Make sure you can add a new OrderItem from the cart and also for operation portal.
Also, try editing quantity for order which are not ‘Sourced order' (An order is ‘Sourced order’ if extra1 field = ‘Sourced Order’).
Try editing any other field from operations portal and make sure no error happens.
Tests
Case 1
In order to generate the case we need an order marked as ‘Sourced order’ and quantityReleased from the orderItem should be greater than 0.
We have an option in the order where you can populate the Order Split 1 field (With a value lower than quantity) and trigger the ‘sourced order’ button. That will create a new order with the new orderItem (Like creating a backOrder)
After generating the order is sourced, verify that extra1 field is ‘Sourced order’ and try editing the quantity on the order item which has been released.
Verify an error appears and verify you can still edit quantities on new orderItems or on orderItems which have not been released.
Note: The orderItem should have a shippingMethod. If it doesn’t have one, you need to go to development tab and assign one code from ‘Shipping methods’ available.
KOD-22644: Employee app - Updates to saved filter UI
KOD-22645: Notes that are marked do not print
KOD-22646: Main site - Product List updates
Regression Tests
Case 1
Verify Manage Category form for the Banner:
Click on the “Manage Category”.
Add or modify content for the banner:
Replace the banner image.
Edit or add a new Title, Description, Button, etc.
Verify that the updated content is displayed correctly on the page.
Check that breadcrumbs are displayed correctly.
Click on each breadcrumb link to ensure it navigates to the correct page.
Tests
Case 1
Navigate to the website.
Click on the “Manage Category” button.
Add a banner image:
Upload an image for the banner.
Test with small and large image sizes.
Add textual content:
Enter a Title.
Enter a Description.
Add a button.
Ensure the image, Title, Description, and Button are displayed correctly on the page.
Test with long text:
Input a long Title and Description.
Verify that the text wraps or truncates as intended without breaking the layout.
Ensure the styles and layout adjust correctly for all screen sizes.
Case 2
Confirm that the breadcrumbs are displayed according to the design mockup.
Locate the “Shop by Application” button and verify that its color matches the hardcoded value as per the design.
Validate banner button and sub-banner background:
Ensure both buttons have the hardcoded color as per the design specifications.
KOD-22647: Change wording on thank you email to Quote instead of Order
KOD-22650: Fix Swagger issue with Files
Regression Tests
Case 1
Mostly all endpoints which involve Uploading a file were modified so we need to test at least the most important ones.
The idea is to test any upload file that you consider most used.
For example, from operation portal you can upload primaryImagefor product/Category, internalFile, etc.
From customer side you can upload a document to an order and change the picture from profile.
KOD-22655: Hyperlinks not showing up as link on site
Regression Tests
Case 1
Check that links on CMS pages outside the content area do not have underlines.
Tests
Case 1
Check that links on CMS pages in the content area have an underlined.
KOD-22657: Purchase Order - Complete generateVendorPDF endpoint
KOD-22660: Bullet Points not aligning correctly on site
Regression Tests
Case 1
Check if you can create page with full-width template.
Check if data you provided on editor is reflected on preview / public site.
Tests
Case 1
Create page with full-page template and check if lists has it’s gap reflected the same as on the editor.
KOD-22659: Updates not Showing for Additional Items to Translate
KOD-22662: Deploy Geocode fix
KOD-22663: Block Releasing To ERP if Sourced Order
KOD-22664: Employee App - Add FAB for creating new records
KOD-22665: Employee App - Quick Order - Add order notes option
KOD-22673: Add google tag to all forms
Regression Tests
Case 1
Submit any form (except log in) and google tag should be on the page still. To check - inspect the page and find “google tag“.
Tests
Case 1
The google tag should now also be on all form pages, not only thank you pages. Check following pages for the tag:
KOD-22674: Implementation - Customer Portal
KOD-22676: Setting for One Time ACH Payment Just like COD Link
KOD-22679: Add search tooling
Regression Tests
Case 1
Make sure you can still search and the prices show.
Case 2
Make sure you can still navigate to the categories and the prices show.
Tests
Case 1
Search for a product → make sure you are in grid view → notice the search score at the bottom of the tile → click inspect → notice the inspector pops up.
Case 2
With the search inspector open, make sure you can click each tab and data is inside.
Case 3
With the search inspector open, click the actions button → click ‘Open product in operations portal’ → you should be directed to that product in the operations portal → now go back to the actions button and click ‘Open search tools’ → you should be redirected to the product search rules in the operations portal.
Case 4
Now click on one of the filters and notice the search score is still present on the tile.
Case 5
Now navigate to one of the categories → notice the search score is on the bottom of the tile (only in grid view).
Case 6
Do the same tests as the search with opening the inspector → clicking 'Open product in operations portal’ and navigating to that product in the operations portal → then clicking ‘Open search tools’ and being redirected to the product search rules in the operations portal.
Case 7
Now click on one of the filters and notice the search score is still present on the tile.
KOD-22683: Add a setting to an e hold orders to indicate them in operations portal
KOD-22682: Parser Fix
KOD-22685: Add a category search endpoint for not authenticated users
KOD-22687: Kodaris - Create DDA V3 app listing
KOD-22693: Add all columns on files grid
Regression Tests
Case 1
For this regression test, we will go to Companies - Select a Company - Customer Files.
We will test the Attach File, Preview and Download buttons.
Then we will repeat the process in the Internal Files tab.
It should work as expected.
Tests
Case 1
For this test, we will go to Companies - Select a Company - Customer Files.
If your selected company doesn’t have a Customer File, you can add one for this test by clicking on Attach file - Customer file.
We will use the Show / Hide Columns to display the recently added columns:
extra1,
extra2,
extra3,
extra4,
extra5,
customerFileUUID (filterable),
processed,
converted,
entityID,
entityType (filterable),
companyID,
extraText,
url,
fileOrder .
They should display the correct information and the filterable fields should also work for that.
Case 2
For this test, we will go to Companies - Select a Company - Internal Files.
If your selected company doesn’t have an Internal File, you can add one for this test by clicking on Attach file - Internal file.
We will use the Show / Hide Columns to display the recently added columns:
extra1,
extra2,
extra3,
extra4,
extra5,
internalFileUUID (filterable),
entityID,
entityType,
extraText,
name,
description,
creator,
keywords,
subType,
alt,
metadata.
KOD-22694: Add preview support for txt files
KOD-22703: Implementation - Test Addons
KOD-22713: Issue on deleting Company Payment Method
KOD-22718: Fix resending an existing email
Tests
Case 1
Endpoint /api/system/email/{emailID}/send (POST) should work now.
There are 3 test we need to run:
Re send the email for one it doesn’t have any customer neither internal files attached.
Re send the email for one it HAS customerFile or InternalFile attached.
Re send the email with the option replyToSend.
When the email is sent successfully, status should change to ‘Sent’ (No matter if the status was ‘Send-Error’ before).
Also, ‘Sent’ date column should be updated with current date.
Case 2
Schedule an email for example from Company screen and check that the email was not sent (You will notice the column ‘sent’ which is not populated and also the status should be ‘Scheduled’
This is the option to schedule an email:
Just select a date like 2m in the future and then, the next time the FiveMinuteIntervalJob runs it will pick up and change the status.
KOD-22719: Add button to email grid to resend email
Regression Tests
Case 1
Open Emails Screen.
Make sure it was loaded with no issues.
Near each email in the grid you should be able to see email preview icon and detail icon. Both icons should work with no issues. (Open Email preview and Email Details Page).
Tests
Case 1
On Emails Screen make sure you can see new email icon near each email in the grid.
Make sure on hover you can see tooltip 'Resend Email'.
Case 2
Create new email within Kodaris system, send it to yourself.
You can test emails with Internal/Customer Files attached or without files attached.
Find this email on the Emails grid. Click Resend Email button.
Make sure on success you’re able to see success snacker with message: Email has been successfully resend and grid should be automatically refreshed.
KOD-22723: Strip characters from zip code
KOD-22727: Implementation - Spin up system
KOD-22728: System Spinup
KOD-22731: Updates for Checkout
Regression Tests
Case 1
Test guest card checkout.
Make sure to test this on Firefox, Chrome, Safari, and on your mobile phone.
Case 2
Test logged in user card checkout. For this test make sure you have no saved card payment methods. Make sure you do not choose save card for later.
Make sure to test this on Firefox, Chrome, Safari, and on your mobile phone.
Case 3
Test logged in user card checkout and saving the card for later.
Then test placing another order using your saved card.
Then test placing another order using “new card” instead of your saved card.
Make sure to test this on Firefox, Chrome, Safari, and on your mobile phone.