We’ve added the ability to add bookmarks to your homepage in the Operations Portal so that you can quickly access the pages you frequently use!
Similar to bookmarks in a web browser, you can mark pages as ‘favorites’ in the Operations Portal so that they will show up as a separate tab at the top of your homepage. By clicking on a tab, it will bring you directly to the page instead of having to search for it in the menu, saving you time and providing an even more user-friendly experience.
Check out the video to see how you can add and remove bookmarks to your homepage.
https://youtu.be/QiJXv5ypdQI
View and print manually created invoices
In this release, we’ve added the ability to view and print manually created invoices in the Operations Portal.
After locating a manually created invoice on either the Accounts Receivable screen or under a company’s Open Invoices tab, you can directly click on the invoice number. This will bring up the invoice file. From there, you will be able to select “Print”. The file will then download to your computer. Once downloaded, the file will also be available in the Customer Files grid in the Operations Portal.
See the video below to learn how to view and print manually created invoices:
https://youtu.be/-gclX1LFNWY
Create a quote within a Lead
When you’re working within a Lead, you can now create a quote while on the lead’s screen. A new button titled “Create Quote” is available at the top right of the screen. Once you generate a quote, you will be redirected to the new quote’s Details page, and the quote will automatically be tied to the Lead in which you created the quote.
Watch the video below to see how you can leverage this feature:
https://youtu.be/QvJ7-z8_hTU
Floating toolbar added to description text boxes
The description text boxes located on the Details page of Tickets and Activities in the Operations Portal contain a WYSIWYG editing toolbar. Previously, when long blocks of text were added to the description, users would have to scroll up to the top of the text box to access the toolbar. Now, the toolbar floats and follows the screen as the user scrolls, making it easily accessible no matter where on the page the user is editing the textbox.
See this new functionality in action by watching the video below:
https://youtu.be/k2WuVVG-aTc
New fields added to the Catalog screen
The Catalog screen under Companies now offers four new fields. The new field titled “Catalog Product Order” allows you to customize the order or position in which you want the products to appear in the catalog. The three additional fields that were added are titled “Company Product Category”, “Company Product Category ID”, and “Company Product Category Product ID”. You can update the values manually or via an import.
Learn more about these fields in the video below:
https://youtu.be/PILnbx0fYPc
Customer Portal
Add emails to receive notifications on Tickets
When a user creates and submits a ticket in the Customer Portal, their email address is automatically set to receive notification emails when there’s an update to a ticket. Now, we’ve added the ability to manually add additional emails for other users who also want to receive ticket notifications. This feature ensures that anyone involved in a ticket will be able to receive email notifications if they wish, keeping all stakeholders informed.
The functionality has been added to the ticket Details screen in the Customer Portal. Once you create a ticket, you will be able to add additional emails under the new “Notification Emails” section.
Watch the video below for a walkthrough on how to use this feature:
https://youtu.be/9AbY1IrBPoU
Mobile App
Warehouse filter added to Inventory screen in Employee Mobile App
When searching through inventory using the Inventory screen in the Employee Mobile App, you can apply filters using the filter icon found in the top right corner. The filter options now include a “Warehouse” section where you can select or deselect warehouses to apply to your search. The search will only return results that are applicable to the warehouse(s) you previously selected.
Once you’ve searched on and selected a product, you will see another new section titled “Other Locations” toward the bottom of the screen. You have the option to expand this section to view all other warehouses that were not selected as a filter that also contain the product you searched for.
Check out the images below, or download the app to see for yourself! If you haven’t downloaded the mobile app yet, head to the App Store or Google Play, search “Kodaris Employee Portal”, and download the app with the Kodaris logo. To log in, enter your company’s domain/URL, your username, and your password. Your credentials will be the same as what you use to log into the desktop version.
Order status visible in the Employee Mobile App
On the Quick Order screen, the order status is now visible next to each order. You will see statuses such as Received, Web Entered, and Error. The order tiles are also color coded using the following key:
White: Orders that are not released and have not been placed. Users can continue to edit the orders freely. The status will be “Web Entered”.
Gray: Orders that were released and placed successfully. These orders will not be editable or openable. The status will be “Received”.
Red: Orders that contain an error. Users can continue to edit the order freely to fix the error(s). The status will be “Error”.
Once a user selects the “Place Order” button at checkout, the order will be pushed to the ERP straight from the app, just as it would in the Operations Portal.
Check out the image below to see the updates to the Quick Order screen.
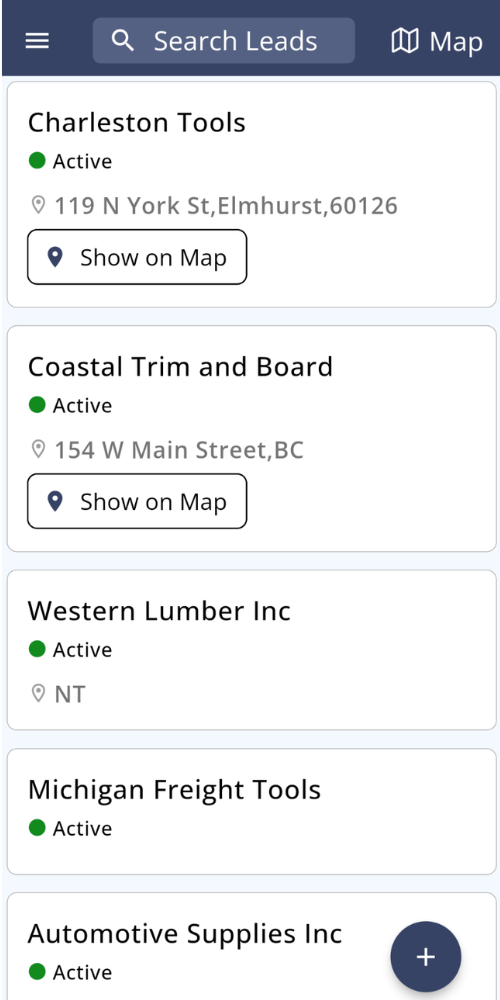
Updates to the Leads screen in the Employee Mobile App
The Leads screen in the Employee Mobile App received a few UI updates, enhancing the way the lead entries are displayed. Each lead entry now has its own tile, and within the tile, you can see the name of the lead, the lead status, and an address if available.
The Leads screen also received a major UX update, offering both Map and List views of the leads. Users can toggle between the two views by selecting the button at the top right of the screen. The Map view uses Google Maps to show location pins of all the lead addresses, while the list view shows a scrollable list of all lead entries.
If there is an address saved for a lead, a “Show on Map” button will also be available within the lead’s tile under the List view. The button will take users to a Google Map with a location pin marking the lead’s address.
Refer to the images below to see the new updates:
Purchase order field added to checkout in Employee Mobile App
A new field titled “Purchase Order” has been added to the Quick Order checkout screen in the Employee Mobile App. This field is not required to place an order, but users can now set a purchase order number if they’d like.
Check out the image below to see where to find the new field.
Shipping method selector added to checkout in Employee Mobile App
Users can now select their desired shipping method when placing an order through the Quick Order feature in the Employee Mobile App. The shipping methods that appear will only be those that are configured via the Operations Portal.
Refer to the image below to see where you can find the new field:
Tickets
KOD-18868: Customer Tickets - allow for CC and BCC of emails on ticket creation
Tests
Case 1
For this test we will go to the Customer Portal - Tickets - Ticket details screen.
You will see the new Notification Emails field.
When you enter an email address and press enter it should be saved as a chip. You can enter as many as you want but you can’t enter the same email address twice.
The content inside this field should be saved in the ticket object as a string, separated by commas.
You can also delete an email address by pressing the X button.
KOD-20416: Unhandle error uploading txt files in Customer Files
Regression Tests
Case 1
Check throwing exception case when we try to upload some customer files which file type isn’t allowed.
At first need to select some type of file which we want to upload, I selected file type: “TXT“.
At first find the setting: allowedCustomerFileTypes
Check the values list → if we have in list the “TXT“ → remove it from list, if you don’t have it → just skip the current step and don’t update setting
Then go to customer list page and try to upload customer file with type “TXT“.
Should be throw exception with message that we don’t allow upload file with type: TXT.
Case 2
Check throwing exception case when we try to upload some internal files which file type isn’t allowed.
Do the same steps which did for uploading customer file case, but check the setting: allowedInternalFileTypes
Select some type of file which we want to upload, I selected file type: “TXT““.
Check the values list → if we have in list the “TXT“ → remove it from list, if you don’t have it→ just skip the current step and don’t update setting”.
KOD-20577: Apply new formula for in stock filter
KOD-20635: Issue with changing any file on Content site
Check if site displayed as expected. Make sure, you can make an order.
Tests
Case 1
Log in to Customer portal. Make an order through customer portal. When you will reach to Checkout - Thank You! page, check if scripts was added to Elements in dev tools and no errors should be displayed in Console.
KOD-21580: Kodaris - Add Documentation on Addons Testing
KOD-21601: Configure & Test Card Payments on Account
KOD-21787: Requested Webform Updates
Regression Tests
Case 1
Navigate to the /s/content/ccpa.
Check Validation.
Leave some fields empty.
Click the Submit button.
Verify that appropriate validation messages appear for the missing or incomplete fields.
Verify the functionality of the select dropdown by choosing different options.
Test the checkbox by toggling its state.
Check the textarea for correct input and interaction.
Submit the form after filling it out correctly.
Navigate to the Operations Portal and check the emails.
Ensure the submitted data is correctly captured and sent through the form.
Confirmed field validation & submitting form - sending not configured on SE.
Verified selection of checkboxes & text input.
Verified form changes dependent on State selection.
Tests
Case 1
Fill Out the Form.
Submit the form with incomplete or incorrect data.
Verify that validation messages appear, highlighting the fields requiring additional input or correction.
Submit the Form correctly.
Open the operations portal.
Navigate to the Emails page.
Ensure all fields completed by the user in the form are accurately reflected in the corresponding email.
KOD-21812: Data Mapping
KOD-21871: Issues w/ Warehouses - Wrong Warehouse
KOD-21878: New Bookmarked Page Added to Homepage Menu
Tests
Case 1
On the operations portal navigate to any page.
Make sure that the star icon is present in the upper right corner next to the icon with the question mark.
Click on the icon to make sure that the backend request is sent and the icon is yellow.
Case 2
On the operations portal navigate to Home Page.
Make sure that the previously added page to favorites is displayed in the list of tabs along with Dashboard, Activities.
Сlick on the added page in the list of tabs and make sure that we go to this page.
Case 3
After going to the page that has already been added, click on the star icon.
Make sure that the request has been sent and the icon has changed color.
Navigate to Home Page.
Make sure that the page you added earlier is not in the list of tabs.
Case 4
On the operations portal navigate to Home Page, having previously added 5-7 pages to favorites, so that the scroll appears in the list of tabs.
Make sure that the list of tabs can be scrolled through and there is access to each added tab.
KOD-21893: Order Automation
KOD-21983: Fix multiple updates
KOD-21985: Mobile App - Create a documentation
KOD-22048: Mobile App - add CC Pay Method screen available for non-CC company
Tests
Case 1
If setting openInvoicePaymentsEnabled disabled, you should not see Company payment methods.
Case 2
If setting customerPaymentMethodsEnabled is disabled, you should not see My Account payment methods.
Case 3
If both settings in case 1 and case 2 are disabled, you should not see Payment Methods option in “…”.
Navigate to the Inventory section and tap the filters icon. Verify the following:
The first time the alert opens, a small loading indicator is displayed while the information is being cached. Subsequent openings should load instantly.
A second dropdown tile labeled Warehouse is visible and expanded by default.
When selecting or deselecting the eye icon, ensure:
The corresponding option becomes highlighted or dimmed accordingly.
A new "Select All" option is available:
It acts as a toggle to select or deselect all options in the dropdown.
This functionality is also available for other dropdowns, including Prices in the Pricing View.
Changes are only saved when the Apply button is pressed and are persisted across app sessions.
When warehouses are filtered in the Inventory view:
A dropdown appears at the bottom of the screen displaying the remaining filtered warehouses.
If no filters are applied to the warehouses, this dropdown should not be displayed.
KOD-22369: No invoices under the Period 3 balances
KOD-22405: Update Sync Payload Service
KOD-22426: Standardize Automated AP Invoiced Date
KOD-22448: Update Address Information on Switch Account Dropdown
KOD-22470: ACH Return Notification Not Working
KOD-22471: Implementation - Configure balances
KOD-22475: Design - Consistent page intro section
KOD-22480: Required Attributes Grid Endpoint
KOD-22514: Direct Order Line Items Going in as Nonstocks
KOD-22522: Create Order End Not Finding Order
KOD-22530: Direct Ship Plugin
KOD-22537: Product Cleanup
KOD-22561: Implementation - ERP Sync
KOD-22565: Update Shipping Options for Store Selection Flow
Regression Tests
Case 1
Check if you are able to place order as a customer.
Check if data on the order are displayed correctly.
Check if select shipping options are displaying and working correctly.
Tests
Case 1
Place something in the cart.
Display our cart.
Go into delivery & payment.
Try to change selected store in the header.
Check if this warehouse is displayed in the cart.
Check if the same address is displayed in the order as ship point destination.
Repeat process to double check if our warehouse is updated correctly.
KOD-22566: Add New Shipping Option
Regression Tests
Case 1
Add some part to the cart.
Check if shipping options can be changed.
Try to go back (ex. to location) and then again to delivery and check if everything is working correctly.
Try to place an order with notes (options other than courier).
Check if notes are correctly displayed on order.
Tests
Case 1
Add item to the cart.
Go to Delivery & Payment-
Check if there is courier option displayed
Check if courier name and courier number fields are required.
Try to change tab or refresh page to check if shipping option is selected as it was previously.
Place Order and check if data that you provided are displayed correctly on notes (courier name, number and additional notes).
KOD-22568: Add Coupons Functionality to Test Site
Regression Tests
Case 1
Go through the checkout.
Make sure the final checkout tab loads fine and everything looks good.
Make sure both addition charges sections and discounts are still shown.
Case 2
On the following templates, make sure that charges and discounts are still shown correctly:
order details
order email
order pdf
account quote email
account quote pdf
account quote details
Tests
Case 1
On the final checkout tab, make sure coupon box looks good.
Check that you can apply a coupon.
If the coupon code is invalid, an error message should show.
After applying the coupon, it should show up in the list of discounts in the order totals section.
Case 2
Place the order, and make sure the applied coupon is applied on the order.
KOD-22572: Select Store Restrictions
Regression Tests
Case 1
Make sure commerce site is loaded with no issues.
Guest and logged-in users should be able to see warehouse at the top header section.
Tests
Case 2
Logged in user.
In operations portal go to Company → Details → Shipping Section Location field. Select there any value (other than 1st option).
Go to the store. Make sure at the top left you’re able to see the same warehouse as you’ve selected on the 1st step. Change the location in employee portal. Reload store page. Make sure at the top left header you see the same warehouse as you’ve set for the Location.
Make sure you’re not able to change the store by clicking on the warehouse button in the top left header section.
KOD-22573: Limit Inventory Displayed Based on Selected Branch
KOD-22591: Update French Order Confirmation Email Subject
KOD-22605: Weight2 related shipping Issue - not displaying freight option for mixed carts
Regression Tests
Case 1
FedEx integration still works: when FedEx is configured as a shippingEngine in the system - shipping options are loaded on checkout step 3.
Tests
Case 1
If a mixed cart of LTL FREIGHT products and parcel products are in the cart, then no shipping options are showing. This is the problem, and this is the part that we need fixed. Need to change this so that if it’s a mixed cart, only the LTL FREIGHT option is showing.
This should now show the “LTL Freight“ shipping option even though Fedex API call is failing.
KOD-22610: Kodaris Homepage Redesign - Development
Tests
Case 1
Add the Custom Paragraph block and confirm that you can edit the text, font weight, line height, and font size for different breakpoints.
Confirm that you can adjust the textAlign setting by clicking the corresponding icon.
Confirm that after clicking Save, everything looks identical on the preview page.
Case 2
Try adding a "custom image" section and confirm that it exists in the list of sections and adds without any issues.
Confirm that after adding, a block appears instructing us to press the "upload" button and upload a photo.
Upload a photo and confirm that it appears in the section, and the block with the button disappears.
Confirm that we can replace this photo by clicking on the block and clicking the "replace" button; after selecting a new photo, it should change on the screen.
Click on the "custom image" section, open its settings, and ensure that we can change the photo size, width, height, object-fit property, add margins and padding, and add border-radius.
Additionally, we can add an alt attribute to the photo through the section settings, and it will be present in the site preview.
After pressing "save," these changes should persist, and it should look identical in the site preview.
Case 3
Add a Grid section and confirm that a grid with 4 cells appears on the screen.
Confirm that you can add any content to those cells, as well as delete and add new cells.
Confirm that you can adjust the columns settings for the entire grid section, and this changes the number and size of columns on the screen.
Confirm that you can modify the column gap and row gap.
Confirm that you can change the order of cells in the settings for each cell.
Confirm that you can change the justify-content setting in the settings for grid block.
Confirm that you can adjust these settings for different breakpoints.
Confirm that after clicking the Save button, everything on the site page looks identical but without the red border.
Case 4
Add a Releases section and confirm that a block with 3 cards appears on the screen.
Confirm that we can change the background color of the section, the background color of the cards, and the text color.
Confirm that after saving and navigating to the site, we see three cards containing release information, and the Read More button redirects to the release's page.
Confirm that the colors we updated remain applied on the site page.
Case 5
Confirm that the Releases section is visible on all types of templates that display the content of a CMS page.
Case 6
Add a Section to the page and confirm that we can adjust the paddings for different screen sizes.
Confirm that if we don't modify the paddings, they remain set to their default values.
Add some content to the section, click Save, and confirm that on the site page, the content, section, and custom paddings work as expected and look identical.
Case 7
Add the Custom Image with Quote section and confirm that it functions the same way as the Custom Image section.
However, if you add an image, a block with a quote appears, and you can edit its title and subtitle.
After clicking Save, ensure that everything looks identical on the site page.
Case 8
Add a Tabs section and confirm that a block with three tabs appears. Ensure that you can edit the titles of the tabs and switch between them by clicking on their headers.
Confirm that you can edit the content of each tab individually.
Verify that you can change the background color of the tab headers block, the text color, the active tab's background color, and its text color.
On mobile, confirm that a slider with navigation arrows appears. Clicking the arrows should navigate to the next or previous tab. Confirm that the right arrow turns gray when on the last tab, and the left arrow turns gray when on the first tab.
# Ensure that everything looks and works identically on the site page after saving.
Case 9
Add the Popover section and confirm that a block with the popover appears on the screen.
Confirm that you can change the background color of the top or bottom part, or the background color of the popover section itself through the settings.
Ensure that everything looks and works identically on the site page after saving.
Case 10
Add the Block With Icon section and confirm that a block with an icon appears at the top.
Confirm that you can change the content of the section.
Confirm that you can change the color of the border and the icon in the section's settings.
Ensure that everything looks and works identically on the site page after saving.
Case 11
Add the Section With Background Image section and confirm that we can choose an image to be the background of the section through the settings.
Confirm that we can add any content to this section, and the background image will remain as selected.
Confirm that everything looks identical on the site page after saving.
Confirm that we can adjust the background-repeat and background-size settings, and the changes will persist on the live site.
KOD-22611: Order updates
KOD-22618: Add Our Brands Page
Regression Tests
Case 1
Navigate to the main page of the application.
Enter the name of any product into the search field.
Verify the following on the /search results page:
Breadcrumbs: Ensure breadcrumbs are displayed correctly, reflecting the navigation path.
Page Title: Confirm that the search page displays the appropriate title, matching the search query.
Product List: Verify the list of products is displayed and corresponds to the search query.
Tests
Case 1
Navigate to the Our Brands page.
Select any brand from the list and click on it to open the brand’s page.
Verify the content of the brand page:
Check if the brand’s logo and description are displayed at the top of the page (if the description is added).
Ensure a list of products associated with the selected brand is displayed below the logo and description.
Case 2:
Open the “Our Brand” page.
Verify that top companies are displayed at the top of the page.
Check the slider section:
Confirm that a company logo is displayed within the slider.
KOD-22623: -99 Invoices - Ability to print in operations portal - UX
Regression Tests
Case 1
Make sure the companies page as well as the order invoices tab still load properly.
Case 2
If customerPaymentTemplateEnabled is 0 or does not exist, when you go to companies → order invoices and click on an invoice # → you should still be redirected to that order if exists or get an snacker error saying order not found.
Case 3
Make sure the accounts receivable screen still loads properly.
Case 4
If customerPaymentTemplateEnabled is 0 or does not exist, when on the accounts receivable screen, you should still not be able to click on any of the invoice #s.
Case 5
On the accounts receivable screen, you should still be able to click into a payment and be navigated to the internal comments screen.
Tests*
Case 1
Make sure customerPaymentTemplateEnabled is set to 1.
Go to companies → click on a company → open invoices → click on an invoice # that does not end in -99 → notice you will see the invoice (same as if you were in the customer portal viewing the open invoice) → now click ‘Print’ → file should be downloaded to your computer and should also be saved to the customer files screen → click ‘Close’ and the popup should close.
Case 2
This time select an invoice that ends in -99 → you should see the service charge invoice (same as if you were viewing the open invoice in the customer portal) → now click ‘Print’ → file should be downloaded to your computer and should also be saved to the customer files screen → click ‘Close’ and the popup should close.
Case 3
Go to the accounts receivable screen → the invoice # should be clickable → if the entry is one of the valid transaction types (differs by company).
Now click on one of the invoice #s that doesn’t end in -99 → you should see the invoice preview (if it isn’t a valid transaction you will see a blank preview) → now click ‘Print’ → file should be downloaded to your computer and should also be saved to the customer files screen → click ‘Close’ and the popup should close.
Now click an invoice # that ends in -99 → you should see the service charge preview (if it is a valid transaction type, if not, you will see a blank preview) → now click ‘Print’ → file should be downloaded to your computer and should also be saved to the customer files screen → click ‘Close’ and the popup should close.
KOD-22625: Kodaris About Page Update
KOD-22634: Parser - Systems
KOD-22666: Employee App - Quick Order - Add option to enter PO Number
Regression Tests
Case 1
Go to: Quick Order view → Select an Order → Press Checkout button, then verify:
Purchase Order Number input is at the bottom of the screen.
If no PON is entered default is empty/blank
Once a PON is typed and saved this will have remote persistence in the order.
KOD-22667: Employee App - Quick Order - Add selector for shipping method
Regression Tests
Case 1
Go to: Quick Order view → Select an Order → Press Checkout button, then verify:
The order starting from the top for the sections is:
Location
Shipping Method
Billing Address
Delivery Address.
Shipping Method is available.
Shipping Method has a default text to select an Shipping Method.
Tap on Shipping Method section will open a modal bottom sheet with all shipping options listed.
Current selection is highlighted with blue color.
Each shipping method has an subtitle for price (if 0 it will show TBD).
Shipping Method is saved when Save button is pressed.
When a Shipping Method is selected this will be displayed in the section card instead the placeholder text.
KOD-22678: One Time ACH Payment: Update the integration
KOD-22680: Split Tender During Release to ERP if Needed
KOD-22688: Surface productCategoryOrder for catalogs on UX
Regression Tests
Case 1
Make sure that Companies-> Company->Catalog screen works well.
You can add/remove columns, add/edit/delete products and catalogs.
Case 2
Check that you can import products into the catalog in the specified order and it display correctly on the website.
Import is doing by externalID.
Need to set for the Company Catalogs (Company Product Categories screen) any value.
But pay attention, that in the file header is parentExternalID, but the value basically is externalID
Tests
Case 1
Check that you can see new columns and add them to the screen Companies-> Company->Catalog:
Company Product Category ID
Company Product Category
Company Product Category Product ID
Catalog Product Order
Case 2
Check that export works on the screen Companies-> Company->Catalog and pop-up has only one field.
KOD-22695: Issue with Entity Type On Tickets
KOD-22704: Populate termstypeDescription
KOD-22712: Employee app - General updates
KOD-22714: Updates to about page timeline (navigation)
Regression Tests
Case 1
Add the timeline section to the page and confirm that it is visible on the screen and no errors occur.
Case 2
Confirm that the text and title in this section can be edited by clicking on the appropriate placeholder and by clicking the save button, the changes remain saved.
Case 3
Confirm that when scrolling through the slides:
We go through each slide without skipping any.
The active slide (the one we are currently on) will have a white color in the pagination.
Сase 4
Confirm that if we add a photo to any column:
The photo will, by default, occupy 100% of the column's width.
If we change the setting in "image max-width," the photo will occupy at most the specified width across all screen sizes.
If we change the “Add border to Image“ checkbox the photo will get the border.
Case 6
Confirm that when changing the settings in "Color," the colors of the content, section, font, or border change correctly.
Case 7
Confirm that to see the column’s Link on the preview screen, we need to add both linkLabel and linkHref fields; otherwise, it will not appear on the screen.
Case 8
Confirm that if we have multiple slides, we can navigate between these slides using arrows.
On the first slide, the back arrow should be black to indicate that it is disabled; the same applies to the right arrow if we are on the last slide.
On mobile, confirm that we only display our arrows, and the decade labels will not be shown.
Case 9
Confirm that when clicking the "Preview" button, we will see the section on the page exactly as it appears on the edit page, but without the "Add New Slide" button.
Tests
Case 1
Confirm that the number of slides per view can be adjusted by opening a settings tab and changing the "slidesPerView":
Change the value for the desktop and make sure the number of columns changes accordingly.
Change the value for tablets and phones and ensure that the number of columns matches the input value on these devices.
Case 2
Add Pagination.
Confirm that clicking the Add New Pagination button displays pagination on the screen.
Remove Pagination.
Confirm that clicking the Remove Last Pagination button removes the pagination from the screen.
Verify that when the last pagination is removed, the Remove Last Pagination button disappears as well.
Сase 3
Confirm that clicking the Add New Slide button adds a new slide to the screen.
Confirm that clicking the Remove Last Slide button removes the last slide from the screen.
Verify that when the last slide is removed, the Remove Last Slide button disappears.
Case 4
Confirm that we can change the content of the slide both by clicking on the corresponding placeholder on the screen and by using the settings in the corresponding dropdown of the slide.
Case 5
Confirm that we can bind the pagination to our slide by going into the settings and opening the pagination settings. We can select which slide will be the first one to be bound.
Confirm that we can change the selected value in the dropdown, and the first bound slide will change accordingly.
Confirm that clicking on the bound pagination will navigate us to the first slide that was selected in the dropdown.
Confirm that when we scroll through the slides bound to a specific pagination, the pagination will have the primary color (white).
Confirm that everything works and looks the same on the live site.
KOD-22730: Add new sku lookup
KOD-22735: Product search on order - UX
Regression Tests
Case 1
For this test we will go to Orders - Select an order that is able to be edited - Items tab.
We will make sure that the button to switch between searching using name or code still works.
We will look for products both ways and add them to the Order.
Tests
Case 1
For this test, we will go to Orders - Select an editable order (usually the ones with ‘Web Entered’ status work) - Items tab.
We will click on the Add item autocomplete on the footer.
This only works when you are searching by code. You should only see suggestions of products where isVendorProduct doesn’t equal true. So “false” and “null” are acceptable values.
Also, when you are searching by code you should only see results where your searchString and the product code match.
We will add some products to the order.
KOD-22740: Add ability to generate a quote from leads screen
Regression Tests
Case 1
Make sure that Jobs → Lead Details Screen is loaded with no issues.
All functionality on that screen should be available.
Tests
Case 1
On Jobs → Lead Details Screen make sure that near attach file button was added Create Quote Button.
Make sure on button click you can see modal window with autocomplete dropdown which companies.
Select a company → Click Create button.
Make sure you’re redirected to your created Jobs Quote Details Page and this created quote is tied to the Lead you’ve been on.
KOD-22741: Images Stretched on Substitute Products Slider and Recently viewed
Tests
Case 1
For this test, we will navigate to a product’s details page and verify the Substitute Products and Recently Viewed Products sections.
The images inside the product cards should no longer appear stretched.
KOD-22747: Add Checks to Checkout Coupons
KOD-22748: Pretty format request body if it is XML or JSON
KOD-22753: Spin up system
KOD-22758: Import Category Tree
KOD-22763: Check Totals on Merchandise Return Invoices Sent
KOD-22768: Implementation - Enable Specs
KOD-22777: Implementation - Customer Portal
KOD-22778:Customer Payment Notification
KOD-22787: Calculation for the manual shipping method
Regression Tests
Case 1
Test applying different shipping options to order in customer app and operations portal.
Tests
Case 1
Test applying manual shipping amount when re-calculating order.
KOD-22791: Fix à sign in footer
Regression Tests
Case 1
Make sure that footer looks good.
Tests
Case 1
Check that copyright icon displays correctly in the footer.
KOD-22790: Kodaris - Fix Outlook Ticket Emails
KOD-22793: CMS - Checkbox Form alignment
Regression Tests
Case 1
Add contact form.
Add checkboxes in contact form.
Check if it’s displayed correctly.
Tests
Case 1
Check if you’re able to add checkboxes and if it’s looking good.
KOD-22817: Employee App - Display quick order status. Place order button to push the order to CSD
Tests
Case 1
Open employee app, go to Quick Orders.
You should see your recent orders, connected to your account.
The most recent orders should be present on the top.
You can load 5 more older orders by pressing “View more”.
Case 2
In the “My orders” list you should see 3 types of orders:
white - not yet released orders. User can go into them and edit freely.
grey - released orders, these order should not be openable.
red - error from the ERP. User can go into them and make changes to fix the error.
Case 3
Test pushing to ERP:
Go to the quick order screen.
Select company, that exists in ERP.
Create an order.
Add items to the cart.
Select correct warehouse.
Enter all other required data.
Press place order.
Press return to home after loading.
Look at the order you’ve created. If it has no errors, then go to step 11. If it has the error, please fix it retest this case.
Test on the operations portal if order was pushed to ERP correctly.
Case 4
For orders with an error, you should see error banner in the checkout section. Clicking on it, will show the error, that happened.
KOD-22823: Map warehouse by county for import
KOD-22829: Create video on getting tracking numbers for an order
KOD-22839: Update slider on brands page
Regression Tests
Case 1
Open brands.
Check if slider is displaying images.
Open some brand and check if images and description is displaying correctly.
Tests
Case 1
Go to brand.
Check if you have <= 12images displayed (should be just displayed with regular order.
Check if you set more than 12 images the array will be shuffled with random images.
Go to some brand and check if padding s are displayed correctly:
only header ( no paddings at all).
header + image (padding only for image)
header + image + description ( padding for image and description)
no image, just description (margin for header + padding for description)
KOD-22840: Disable sku mass creation by endpoint
KOD-22841: Improve events screen performance
KOD-22846: Wrap "split order" button in a setting
Regression Tests
Case 1
Make sure order details page still loads correctly on the operations portal.
Tests
If enableSplitDirectOrder is not existent or set to 0 and the order has not been released yet, you should not see the split direct order button.
Case 2
If enableSplitDirectOrder is set to 1 and the order has not been released yet, you should see the split direct order button.
Case 3
If the order has been released and enableSplitDirectOrder set to 1, you should not see the split direct order button.
KOD-22850: Kodaris - Make toolbar float on editor on customer tickets
Regression Tests
Case 1
Open the Ticket page and confirm that it loads without issues and displays ticket information along with the Description field.
Ensure that you can edit the text in the Description field, add a table, list, bold text, underlined text, and other formatting options.
Confirm that the changes remain on the screen after a rerender.
Repeat the same checks for the Customer Comments and Internal Comments tabs.
Confirm that steps 1-4 work the same way on the Activity page.
Tests
Case 1
Add a lot of text to the Description field and scroll down. Confirm that as the toolbar is about to scroll off the screen, it sticks to the header and scrolls with you. When you reach the end of the input field, the toolbar disappears along with it.
Confirm that if you scroll upward from the bottom, the toolbar immediately reappears and scrolls with you until it returns to its original position at the top of the input field.
Scroll so that the toolbar is stick to the header, then switch to a neighboring tab and back again (without scrolling back up). Confirm that the scroll position remains the same and the toolbar is still stick to the header.
Case 2
Open the Ticket page and click on the Actions button. Confirm that a dropdown with options appears and is not overlapped by the header's box-shadow.
Confirm the same behavior with the popover when clicking on the question mark icon.
KOD-22851: Kodaris - Enable word wrap in ticket editors
Regression Tests
Case 1
Open the Ticket Customer Comments page and confirm that it loads without errors.
2Do the same for the Ticket Internal Comments page and verify that it loads without issues.
Case 2
Confirm that you can write a comment, modify it as needed (e.g., add a table, code, list, italicize or bold text), and after submitting the comment, it will appear the same way in the comment list below.
Tests
Case 1
Add a comment with very long text and confirm that the text doesn't overflow the input area but instead wraps to the next line.
Case 2
Add a comment with many words and confirm that the last word wraps completely to the next line, rather than just a few letters spilling over.
KOD-22853: Shop By Store Selection fix
Regression Tests
Case 1
Check if customer (logged in / not logged in) can select store.
Check if not logged in user has set store based on the first one from list of available warehouses.
Check if logged in customer has set selected store.
Tests
Case 1
Check if not logged in user has set store based on the first one from list of available warehouses.
Check if not logged in customer can change store.
Log in, check if selected store is the same by default as warehouse from shipto - In operation portal → companies → select companies that you set for new customer → Addresses.
Refresh page to check if there is no unnecessary reload or api call if user already has this selected store.
Select other store from menu Shop by Store.
Refresh page if you’re still on your selected store.
Log out.check if customer is on store from shipto (default warehouse).
KOD-22856: AP Parser
KOD-22862: Implementation - Spin up System
KOD-22865: Implementation - Remove shadows
Regression Tests
Case 1
Make sure the product list page still loads correctly.
Tests
Case 1
Go to the product list page and notice the add to cart button no longer has a shadow.
For this test, we will go to Categories - Select a category - Filter Categories tab.
If you don’t have any Filter Category assigned where “Required” value equals true, you need to add at least one.
Now, we will go to Required Attribute Assignment tab.
There, you will see a grid with “Product ID”, “Code” and “Name” columns. The rest of the columns on the grid will match the required Filter Categories you set up on the previous step.
We can even go back to the previous tab and add or delete a Filter Category. After reloading the Required Attribute Assignment screen, the columns should be updated.
We can use the Show / Hide Columns button to display or hide the columns we want.
Case 2
For this test, we will go to Categories - Select a category - Required Attribute Assignment screen.
In this grid, we will see a list of products that are missing at least one value from one of the required Filter Categories that Category has.
There can’t be any products on the Required Attributes Assignment screen that have all of the required Filter Categories values assigned.
We can test this by going to Products - Select a product that is included on the Required Attribute Assignment grid - Attributes tab.
We will add attributes for all of the required attributes to that product. Then, we will reload the Required Attribute Assignment grid. That item should no longer be displayed on that table.
If we delete at least one of the required attributes from the product, it should be displayed on the table again.
Case 3
For this test, we will go to Categories - Select a category - Required Attribute Assignment screen.
We will double click on one of the “fg_” cells. This will open an autocomplete field. The options you can select there should only be of the same type of the column.
You can test this by going to the Filter Categories screen - Selecting a category. The options displayed in the autocomplete should match the list of attributes of that Filter Category.
We are going test the autocomplete functionality by entering some text on the field. This should filter the options displayed.
We are going to select one of the options.
If there wasn’t a value on the cell before, a POST endpoint should be called and now that attribute is assigned to that product.
If there was a value before, a PATCH endpoint should be called and now the old attribute was replaced by the new one.
If you happen to click on a cell that had a value and delete the content and click away, a DELETE endpoint should be called and now that attribute is no longer part of that product.
You can test that by reloading the Attributes grid on the Products screen on every case.
KOD-22871: Add quantity field to additional orders view
Tests
Case 1
For this test we will go to Orders - Select an Order that has associated orders - Associated Orders tab.
We will use the Show / Hide Columns button to display the new recently added column “Quantity”.
You should be able to see that column now with the correct information.
Case 2
For this test we will go to Orders. We will test both the Search and Data tabs.
We will use the Show / Hide Columns button to display the new recently added column “Quantity”.
You should be able to see that column now with the correct information.
In the Search tab we will also test the searching and sorting functionality.
In the Data tab, you should be able to edit the value of the quantity field. It should be updated appropriately.
Case 3
For this test we will go to External Orders and then to Summary Orders. We will test all tabs on those two screens.
We will use the Show / Hide Columns button to display the new recently added column “Quantity”.
You should be able to see that column now with the correct information.
In the External Orders - Search tab and in the Summary Orders screen we will also test the searching and sorting functionality.
KOD-22874: Add Parent Order Number Column to the Customer Portal
Tests
Case 1
For this test, we will go to the Orders screen - Search tab.
We will use the Show / Hide Columns button to display the Parent # column.
The data should be displayed on rows that have it and you should be able to use the searching functionality on that column as well.
KOD-22876: Add a default shipping option for order by store
KOD-22879: Payments Integration Updates
KOD-22881: Check hideProductsFromGuestUsersUnlessInventoryAndListPriceExist and add filter for type as you search and product view pages
KOD-22880: Reindex products when status changes on the sku
KOD-22883: Default pricing on some products
KOD-22884: Main site - Quantity of products on the cart icon is not updated
Regression Tests
Case 1
Check that the “View Cart” block looks correct.
Check that products are added/removed from the cart correctly.
Check that there are no errors in the console when adding/removing items from the cart.
Tests
Case 1
Check that the counter for the number of items in the cart works correctly (when adding/removing, completely emptying the cart).
KOD-22887: Customer Tickets - allow for CC and BCC of emails on ticket creation - Platform
KOD-22890: Create special role to view Punch Out orders
Regression Tests
Case 1
Check whether employee with role administrator has access to pages: /punchOut/file/list, /punchOut/file/view
KOD-22891: Create settings for activity fields - Platform piece
Tests
Case 1
Verify the new settings exist and those appear under api/user/employee/configuration endpoint so they can be used for ux.
KOD-22897: Fix for logged in users lead times (OAN products)
KOD-22898: Implementation - Font Family
KOD-22899: Automatically Tag Customer Accounts to the Right Host/Site - Small update
KOD-22903: Deep click tracking
KOD-22906: Parser Fix Part 2
KOD-22907: Product Pages Banner - Record a video
KOD-22908: Update Employee Mobile App Listing Screenshots
KOD-22913: Adding a new option to the Url Rewrites screen
Regression Tests
Case 1
Make sure you can still select a section on the URL rewrite page.
Tests
Case 1
On the URL rewrite page, when adding in a new rewrite, make sure under the section column, you can select the new option of 'Rewrite 302'.
Case 2
Make sure you can edit one of the rewrites already there and select the ‘Rewrite 302’.
KOD-22917: Update from new PO
KOD-22919: Implementation - Branding
KOD-22922: Finish uploading Images to Products
KOD-22921: Main site - Rename label
KOD-22925: UX Updates to AP Invoice Detail Screen
Regression Tests
Case 1
Make sure the AP Vendor Invoices screen still loads properly.
Case 2
Make sure you can still click the calendar icon and select a date under the invoice date.
Tests
Case 1
On the AP Vendor Invoice details page, click the Purchase Order # box → notice it is now an autocomplete form field → start typing in a PO # → the suggested PO #s should pop up along with the company name → click one of the options → notice the open in new tab icon appears in that form field → click the icon → you should be navigated to that purchase order in a new tab.
Case 2
Notice the external invoice number field (above invoice date) now is labeled Invoice #.
Case 3
Open network tools → update both the Invoice # and the Invoice Date → notice the invoice # is being stored on the externalOrderNumber field and the invoice date is being stored in the extra 3 field.
Case 4
When erpInUse setting is turned on or off, you should now be able to update the following:
ERP # (as long as there is a value in the extra5 field)
Status (as long as there are values in the vendorInvoiceStatuses setting)
KOD-22928: Add Details view to ERP Quotes screen in operations portal
Regression Tests
Case 1
Make sure the navigation on the left side still loads properly.
Case 2
Make sure you can still search on the left side navigation.
Tests
Case 1
Go to the left side navigation → click on CRM → notice the ERP Quotes is no longer a selection.
Case 2
On the left side navigation, start typing in ERP quotes and notice that is no longer an option.
KOD-22930: Employee App - Support redirect from kodaris.com to www.kodaris.com websites
Regression Tests
Case 1
Regular logins on domains without redirect should work fine.
Tests
Case 1
Logins on domains with redirect should also work fine.
KOD-22931: Implementation - Updates
KOD-22932: Show Payment Terms on Order Confirmation Emails
KOD-22933: Create a sendEmail to several employees at the same time endpoint.
Tests
Case 1
New endpoint created to send massive emails. Only host and administrator object are in scope.
Endpoint: /api/system/employee/sendEmail
Payload:
{
"templateCode": "employeeAccountActivation-EJS",
"employeeIDs": [
14,10
]
}
Verify email is sent and also, if something fails (For example a wrong employee ID), the emailAddress saved in setting: storeEmailAddress.
Will receive the report email.|
Case 2
For sending an schedule email you have to populate the date:
{
"templateCode": "employeeAccountActivation-EJS",
"employeeIDs": [
14
],
"scheduledDate" : "2024-11-28 18:05:40"
}
And also have the setting: jobProcessScheduledEmails enabled.
Then, you should see an email created with status = ‘Scheduled’.
Then, when fiveMinuteIntervalJob runs, it will pick up all the emails before the date that last time fiveMinuteIntervalJob ran. So, if you put a scheduledDate in the past (Like 1d ago), the email should be sent as soon as the fiveMinueIntervalJob runs.
KOD-22935: Displaying script in the customer tickets
Regression Tests
Case 1
Open the Ticket page and confirm that it loads without issues and displays ticket information along with the Descriptio* field.
Ensure that you can edit the text in the Description field, add a table, list, bold text, underlined text, and other formatting options.
Confirm that the changes remain on the screen after a rerender.
Repeat the same checks for the Customer Comments and Internal Comments tabs.
Confirm that steps 1-4 work the same way on the Activity page.
Tests
Case 1
Using Swagger, add a {{ }} tag to the Description field (e.g., {{ alert(\"Hello }}).
Confirm that the script text appears as plain text in the Description field.
Confirm that you can edit this text in the Description field and it does not disappear.
Using Swagger, add a {{ }} tag with additional HTML content, such as:
{{"In the last email, please use this script instead,\n\n \n\n\n\nLet us know if any questions,\n\nThanks!"}}
Case 2
Using Swagger, update the Description field of the ticket to an empty value.
Confirm that on the site:
A placeholder appears in the Description field.
You can add a new description without any issues.
No errors are logged in the console.
KOD-22938: Employee App - Leads/Jobs screen update to unified view with searching and filtering
KOD-22939: Enable Registration Form
Regression Tests
Case 1
Navigate to the website and open the Registration page.
Log in to the Operation Portal and set the value of the setting customerRegistrationEnabled to 1.
Fill out the registration form with valid details and click Submit.
Go to the Operation Portal Emails page to verify that the registration confirmation email has been successfully generated.
Tests
Case 1
Navigate to the website and open the registration page.
Access the operation portal and set the value of the setting customerRegistrationEnabled to 0.
Fill out the registration form and click Submit.
Go to the Operation Portal Emails page to verify that the registration confirmation email has been successfully generated.
KOD-22940: Add Search Tools
KOD-22942: Display Shipping Address Tweak
Regression Tests
Case 1
Open the site and add a product to the cart.
Proceed to the checkout page.
Fill out the checkout form.
Place the order.
Verify the order is successful.
Tests
Case 1
Open the website and add a product to the cart.
Proceed to the checkout page.
Click on “Search for a Shipping Address” to display the dropdown menu.
Verify that the title now displays: “shipto - locationName - city”.
KOD-22943: Location Tab Updates
Regression Tests
Case 1
Open the site and add a product to the cart.
Proceed to the checkout page.
Fill out the checkout form.
Place the order.
Verify the order is successful.
Tests
Case 1
Open the site and add a product to the cart
Proceed to the checkout page.
Verify that Name, Last Name, Email, and Phone Number fields are displayed as required fields.
Modify field requirements in the operation portal.
Navigate to the “Custom Fields” section.
Disable the enableAddressRequiredFields configuration.
Attempt to proceed to the next step in the checkout process without filling in Name, Last Name, Email, and Phone Number fields.
KOD-22945: Employee App - Issue with order on different sites
Regression Tests
Case 1
Make sure to add recent sections and items, In the Dashboard View.
Proceed to log out of the app, then log in again.
Verify that *the Dashboard view does not have information from the previous session.
KOD-22948: Implementation - Email Templates
KOD-22949: Implementation - Order PDF Templates
KOD-22951: Add local branch text field
Regression Tests
Case 1
Check that the “Request a quote“ form is sent correctly; the request is sent to the Network tab with the status 200 OK.
Check that there are no errors in the console.
Tests
Case 1
Check that the “Request a quote“ form contains the text field “Local Branch“.
KOD-22954: Employee App - Fix slow loading for data-table screens
Regression Tests
Case 1
Test if Saved filters for any table are loaded correctly.
Test if on creation of saved filters, it gets loaded into the list of saved filters.
Tests
Case 1
The data-grid screens should not take long time to be loaded.
KOD-22956: Test releasing order to ERP
KOD-22957: Mobile Apps - Experimental
KOD-22960: Implementation - Customer Portal
KOD-22961: Implementation - Payment Methods
KOD-22962: Implementation - Guest checkout
KOD-22963: Implementation - Countries & States
KOD-22966: Contact Us - Submit button is not functional
KOD-22968: Update invoice templates to show tender and final calculations
Regression Tests
Case 1
Make sure that the order details, order email, order pdf, and order pdf mailer templates all still work correctly.
Tests
Case 1
For orders that are invoiced or paid, and have a downpayment, there should be an additional line in the order totals section: ‘Downpayment’.
The order total should also be updated to take into account this downpayment (total - payment).
KOD-22970: Add comment count on orders search screen
Regression Tests
Case 1
Just navigate throw order screen and make sure you don’t see any error in main data tab search or in the details screen.
Tests
Case 1
Verify /api/system/order/list contains the count fields (Data tab).
KOD-22971: Add preview support for txt files under tickets
Regression Tests
Case 1
Check that the layout of Internal Files and Customer Files tabs look correct.
Check that there are no errors in the console when opening file previews in Internal Files and Customer Files tabs.
Check that files on the Internal Files and Customer Files pages are loaded correctly.
Tests
Case 1
Check that the preview of the .txt file opens correctly. The preview contains file data.
KOD-22973: Allow choosing dates during checkout
Tests
Case 1
The user should now be able to set delivery date and time on an order. Add items to cart and proceed with checkout. On step 3 there should be a date/time selection. Confirm that the values are being set in the operations portal.
KOD-22976: Ticketing System - Non User Set up with Access when Company Assigned to Ticket
KOD-22978: Items not Populating
KOD-22979: Kodaris - Make Unpublished pages color-coded
KOD-22986: Set up Kodaris URL
KOD-22988: Implementation - Shiping Methods
KOD-22999: Location Field Update
KOD-23001: Remove Service Charge YTD and On Order fields from statement
KOD-23002: Implementation - search
KOD-23006: Email Sending Setup
KOD-23010: Add new search rule to redirect exact product matches to product page
KOD-23011: Add additional product redirect rule to the product redirect tab
Regression Tests
Case 1
Create a New Row.
Remove the newly added row and verify it is no longer visible in the table.
Refresh the table and ensure all data is reloaded correctly.
Add additional columns to the table and confirm they are displayed correctly.
Hide the previously added columns.
Tests
Case 1
Navigate to the Product Redirect Tab.
Ensure that the “Pattern” column is visible by default.
Create a New Row with a Pattern.
Modify the Pattern Using the Dropdown.
Refresh the table and confirm that all rows with patterns containing customerProductCode or productCode are displayed correctly.
KOD-23023: Vendor Invoice Data Grid - View invoice uses wrong API
Regression Tests
Case 1
For vendor invoice internal files, make sure you can still see the file icon, file preview, and download the file fine.
Tests
Case 1
When you preview or download a vendor invoice file, make sure that its now using the vendorInvoice endpoint.